My Blog List

How to Make an Easy Heart in Inkscape

There are many ways to make a heart in Inkscape. Some are easier than others for a beginner or for one who is still learning the software. Tinkering with it myself, I found this way of making a heart. As far as I have seen, most all tutorials start with a circle. I didn't. This is not the only way I want to make hearts, but this is the fastest and simplest for now. I hope you enjoy the tutorial and find it useful.
Fire up Inkscape.
Choose the Polygon tool. At the top of your page there will appear two options, a pentagon or a star. Just write 5 corners, and you will get the
pentagon. Choose a color from the palette at the bottom of your page and draw your pentagon. Now go to Path, Object to Path. Then click on
the nodes tool, which is directly underneath the black little arrow at the top of the sidebar toolbar and add some nodes to your pentagon.
When you are comfortable with how many you have added, just pull the bottom node down to get the pointed bottom of a heart, pinch the center of the
pentagon to get the center of the heart and "fix" the sides to your liking. Now, while the nodes are still selected, go up to the top of the page and select the
smooth node button, which is the 10th button from the left on the top of the page. This will smooth out the lines on the shape of the heart.
This is the simplest way to get a heart in Inkscape. There are other
ways and we might explore them, but play with this one in the meantime!


If you would like to make your heart fancier, lets work on it a little more.
Click on the heart with the select tool and then go File, Duplicate. Move the duplicate heart to the side. Change the duplicate to a darker color.
Since my main heart is peach, I chose to change the duplicate to a dark brown. Now, while the duplicate is selected, go to the top of the page and click on
the 9th button at the top of the page to Lower Selection One Step, now move the darker heart behind the original heart just enough to create a shadow.
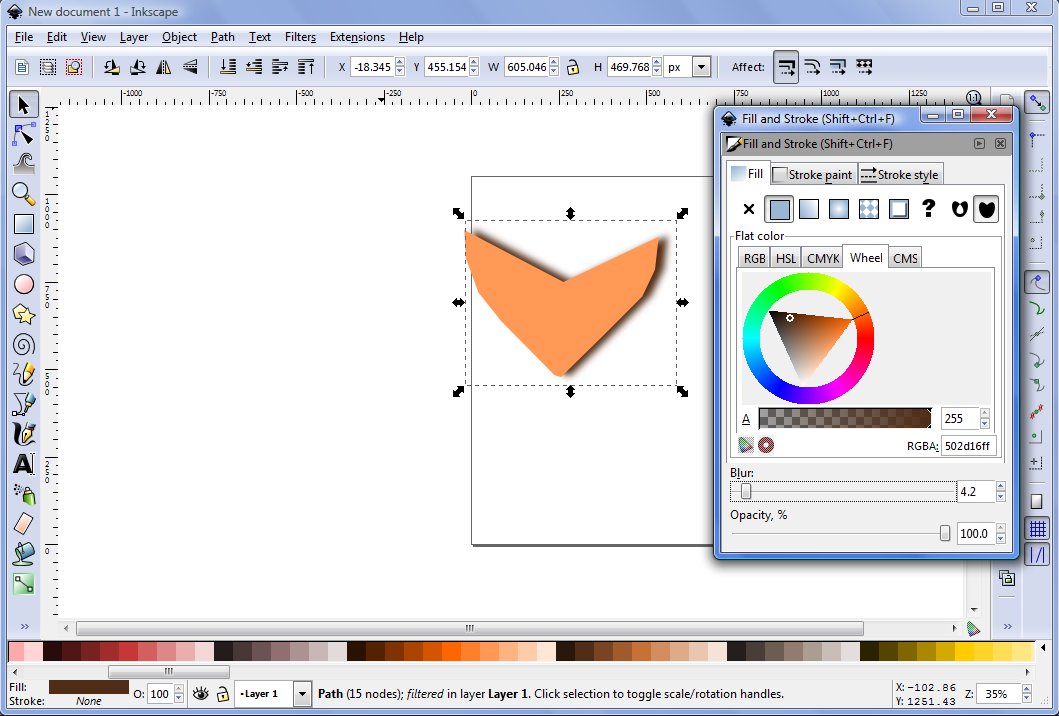
At the bottom of the page, to the left hand corner of the palette, right-click on the Fill, when the little menu opens, choose edit Fill and Stroke. But we will
not be working on the colors, but simply choose a 4.2 blur for the darker heart to turn it into a drop shadow. You can stop right there if you want to, or you
can make your heart a bit fancier still.

If you want it a bit fancier. Click on the first heart (without moving it from where you have it) just to select it, then go to File, duplicate. Now on the palette
below, choose black to change the color of the new duplicate or the darkest color in the palette color of your main heat. I chose a dark, almost black, chocolate.
Now, look at the sidebar. Almost at the buttom, below the bucket fill is the gradient tool. Choose that. And now click on the duplicate you made and stroke with
your mouse upward to create a gradient that will start dark at the bottom point of the heart but as it gets more transparent, it will reveal the original color
you had picked underneath. You can stop there and you have a pretty heart already.

If you want to make it a bit fancier still. Click on the Heart you just shaded with a gradient and select file, duplicate again. This will place another copy of the
heart on top of the one you had and will make the gradient darker. If you like that effect, you can leave it, but we don't want that, so we will choose a lighter
color than the one the original heart had. Then, we will choose the circle tool, select the color white, take out the stroke color by right-licking on the
stroke space right below the palette, and when the drop down list opens, choose Edit stroke and then, when it takes you to the menu, where you will just click on the
X to deselect the stoke color. Make an oblong white shape that will cover the top of the heart. Now, while the oblong shaped is selected, hold the shift key down and
select the heart. This will select both shapes. Now go up the Path, Intersection. This will cut off part of the color and show what is underneath.
Now click on the spot where the oblong used to be that has been cut out, and make it white again. Go to the gradient tool and starting from the top area outside of the
heart and using the left key of your mouse, draw a gradient down. Now go to the Path menu, and go to inset, so that an edge will be created around the lighter part of
the heart. Now select the heart again, and go to Filters, Bevels, Raised Border. Now select the lighter part that we made inside the heart and go to Filters, Bevels,
Deep Colors Plastic. This will give you a fancy heart indeed with very little effort. You can also go to Filters Bevels, Melted Jelly.

Play with it in different colors!

Now you can also make the basic heart shape like we did at the beginning. Cut and paste it into Gimp.
Now you can do a number of things. I chose to go to Filters, Gaussian Blur and blur the original to 13 pixels. Then I took the bucket tool and filled the shape with a
pretty pattern. Finally I went to Script-Fu and chose Drop shadow. Merge layers. Save as a Png.

 Done!

How to Make a Pretty Decorative Element in Inkscape and Gimp


Elements are a great part of scrapbooking. It seems you can never have enough of them!
This is an easy and pretty one to make.
Open Inkscape.
On the sidebar click on the ellipse or circle tool.
While holding down the Ctrl key, draw a circle (that way the circle will be perfectly round) any size you want your heart to be.
On the bottom of the page, to the left, right-click on Stroke, then on Edit Stroke. When the Stroke menu appears, click on the
X to delete the stroke around the circle. Only so that you can see it well, fill with a color of your choice by clicking on
any color on the palette below.

Now, let's make the edging around the element.
Click on the Text tool and write the letter "O" in caps. Click on the color you have chosen on the palette, so that the letter will get that same
color. The font I chose is Roller World BTN Bold Out, 144 pixels, Bold, but you can choose any Inkscape font that you like. With the arrow tool, click on the letter to select it, now click on it
again to rotate it, and rotate it so that the "O" will be upside down. Click on the "O" again to select it. Now, take a look at the toolbar on top of your page. Counting from the left, the 11th tool will raise
your object to the top, click on it.This will make sure that your decorative edge will not sink to the bottom of your element.
Now, while your "O" is still selected, press the shift key down and click on the circle to select them both.
When they are both selected, go to Path, Object to Path. Then go to Extensions, Pattern Along a Path and once the menu opens, select Repeated, Snake, Space between copies: 0.4
Leave everything else as is and click Apply. Let it calculate and render.
Now, hold the shift key down and create a selection that covers the whole thing. Go to Object, Group. Now you can move your circle without it falling apart.

Because Inkscape has the tendency to tile patterns, and I want to fill this element with a pattern that is seamless, we will go to Gimp and fill it up there.
So Go to File, Export and export your element as a PNG image.

Close Inkscape and fire up Gimp. Open your element in Gimp.
Click on the Bucket Tool. Select Pattern fill, and then, click on the little menu to choose any pattern you like. There are many free patterns for Gimp on the Net that you can
download and use. Once you have filled your element with your pattern, go to Script-Fu, Drop Shadow. Raise the Opacity to 80.0 and leave the rest as is and click Okay.
Now to go Filters, Blur. Once the blur is applied, go to Layer, Merge Down.
Now go to File, Save As, Select File Type by Extension and pick PNG, and replace your previous file.

Done!
Heaven Hell

Kitty Cat Journaling Block


I love cats and thought a cat head would make a cute journaling block and I had to try to make one! I did not have anything to go on, so I winged it.
Here is the way I was able to make it.
Start up Inkscape.
Choose the Ellipse tool. Make a circle, any size you like.
Now, choose the star tool, reduce the number of corners to 3 to really make a triangle.
Make a triangle.
Now choose any color you like and fill both the circle and the triangle with that color by clicking on them.
Duplicate your triangle or copy and paste it on the side of the circle.
Now, click on the triangle twice, when you see little arrows all around it, that is the rotate tool, turn the triangle sideways
until it is in a position that would make it look like a cat's ear on the side of your circle. Move the triangle so that it is
right next to your circle, no white line in between. Now click on the other triangle, click again so that the rotate arrows will
appear, rotate it in the opposite direction so that it will form the other cat ear. Place it on the other side of the circle, which
is your Journaling Block and the cat's head. Now Select the arrow tool at the top of your sidebar tools and stroke with your mouse
to select all the objects. Go Object to Path, now go Object Group.
All the pieces will be united into one.
Click to select and copy.


Now open Gimp.
Once Gimp is open, paste your cat head there. Go to Blur, Gaussian Blur and blur by 1 or 2 px.
Now go to Script-Fu and select Drop Shadow. Apply it.
Now change your Foreground color to #7b173f, which is a rich mauve and will show clearly with any pink. (By the way, the color that I chose for
my cat head is #ff2ad4. You can use that or change it to any color you like, before you add your journaling lines.
Select the pencil tool and choose the size Circle 11. Now, while holding down the shift key, click on the cat head where you want your first line
to be, draw the line and click on the end to finish it. Repeat as you wish.


You can leave it as is, or you can make it fancier.

Download from the internet any free texture you like for the theme you're using your cat journaling block for. I chose a pretty white and pink check
I have in Gimp. Once you download it, you must save your work up to this point as a PNG. Close Gimp. Go to your Computer, Program Files, then find
Gimp, and look in its files, depending upon your version of the software, until your find Patterns. Copy and paste the file into that folder or drag it into it.
Open up Gimp again and open up your work. Now, choose the Paint Bucket, then on the tools menu, pick Pattern Fill and choose the one you want.
Apply the Bucket tool to it.


Now you can make the Mauve lines again if you want to and it will be pretty enough.
But I want it cuter. So I went back to Inkscape, because this type of thing I find it easier to make over there.
I opened up the program, chose File, then found my kitty cat head and chose Embed.
It came right up. Then I made a circle in a hot pink. Right clicked on Stroke, once the stroke menu opened, I chose Edit Stroke, changed the stroke color to white, then I picked some dashes that I thought would look nice, and raised the width to 6.000
and my circle had pretty white dashes all around and it looked as if it had been stitched. I dragged into the kitty cat head and centered it. Exported it as a PNG.
You can write on it as it is, but I wanted some lines, so I opened up Gimp again and wrote my journaling lines there as we did with the first example.

Hope you liked this tut!


..........
Everlasting Happiness

Caterpillar Decorative Journaling Tag


I just came up with this tag today. Never have seen a caterpillar tag, but this looks like a caterpillar to me, so the name stuck. Scrapbooking is a creative activity so something as fun as a caterpillar journaling tag or label is a natural!
Open Inkscape.
Choose the Ellipse or Circle tool, make a circle any size you want.
Select a color you like and fill it with it. Right click on stroke (below the palette at the bottom of your screen), when the menu opens,
choose Edit Stroke. Then when the new menu opens, click on the little "X", so that your circle will have no stroke. Close the menu.
Now duplicate your circle twice. Move the second circle to be just below the first circle, and a little bit into it, then repeat with the thrid circle.
Click on the first circle to select it, go to Path, Object to Path. Select the second circle, and go to Path, Object to Path, repeat with the Third Circle.
Now click on the select tool (the black arrow at the top of your vertical toolbox) and select all three objects. Now, with the tree circles selected, go to Object, Group.
Now, we have our caterpillar.
Go to File, Export Bitmap and give it the name Caterpillar Journaling Tag. It will export as a PNG file.

We can do a lot more things on Inkscape, but I want to do some things in Gimp.

Now open up Gimp.
Open the caterpillar image.
For your Foreground color, choose #e7b0b0
Choose the pencil tool and the size Circle 07
Now, holding the shift key down, click where you want the first line for the journaling to appear, stretch your line across the ball
that forms the head of the caterpillar and click to finish the line. Repeat as many times as you like.
Click on the Pencil tool again and choose a pencil size, then click on the eraser tool and make a hole at the top of the caterpillar
head. Now to to Script-Fu and choose Drop Shadow, apply it leaving the settings as is.

If you want to, go to Bevel and Emboss, and choose Inner Bevel, give it a Depth of 10, Direction Up, Size 10, then leave the rest as is. Click okay.
Export as a PNG again.
That is it!

Variation: You can use the bucket tool and fill your caterpillar with any texture that you like. There are thousands of free textures for Gimp online!

..........
Everlasting Happiness

Pretty Decorative Element for Scrapbooking


This is a different version of our previous tutorial which was so much fun and has been so popular!
Open up Inkscape.
Choose the ellipse or circle tool and Make a oval (770.196 w x 1359.67) or any size you like, hold down the Ctrl key as you make the shape so that it will have a perfect form. Make sure that it is vertical.
Choose a color from the palette at the bottom of the page, I will choose a nice happy lime green because that matches a photo I will be using it in. Click on the oval to fill it with the color. Now right click on stroke at the bottom palette toward the left of the page, and when the menu appears, click on the “X” to choose no stroke.
Now click on the Text tool and type anywhere on the working area the capital letter V. You can choose any font you want. I picked ZapfHumnst Ult BT and for the font size I chose 144.
Click on the letter to make it the same color as your oval, now click on the 10th icon on the top of your page, (the second one underneath the word Text), to make sure that your letter "V" on top of your oval. Now click on the letter so that the arrows will appear all around it and stretch it a bit to make it larger. Now, click on the “V” again to select it, and click for a second time, little arrows will appear that indicate you can rotate the letter,
Grab one of the corner arrows and rotate the letter so that the “V” is upside down, that is how we need it for our decoration.
Click on the letter and put right above your oval (that will make it easier to group them), now, while the arrows that select the "V" are still active, hold the shift key down and click on the oval. That will select both objects at the same time.
When they are both selected, go to Extensions, Generate from Path, Scatter. Click on the first two boxes, then click on Cloned, and then choose apply. Wait till it applies and now you see that you have an oval with an open scalloped edge. Click on the oval and while it is selected, go to Object, Ungroup. Then click on the open scallops, and go to Object, Ungroup. Now you see all the small “Vs” around the oval. Now, holding the shift key down, stroke with your mouse to select all of the objects (the oval and the little circles must fit into the selection), then go to Object, Group. Now you can move the whole thing around, because it has become one object and it won’t fall apart when you move it.

Now go to File, Export Bitmap and export as a PNG file.
I like my images to be smooth, so I took my scalloped oval to Gimp and applied a simple blur. If you want to add a drop shadow, add it by adding a layer, then going to ScriptFu and add Drop Shadow. Then saved it again.
Done!

Bible Universe

How to Make a Scalloped Oval Digi Scrapbooking Element in Inkscape


This tutorial assumes that you have both Inkscape and Gimp installed on your computer, and that you have followed at least some of our previous tutorials to
get an idea of how the free software works.

Open up Inkscape.
Choose the ellipse or circle tool and Make a oval (770.196 w x 1359.67) or any size you like, hold down the ctrl key as you make the shape so that it will have a perfect form. Make sure that it is vertical.
Choose a color from the palette at the bottom of the page, I will choose a pale purple because that matches a photo I will be using it in. Click on the oval to fill it with the color. Now right click on stroke at the bottom palette toward the left of the page, and when the menu appears, click on the “X” to choose no stroke.
Now click on the Text tool and type anywhere on the working area the capital letter O. You can choose any font you want. I picked Rockwell Extra Bold and for the font size I chose 144.
Click on the letter to make it the same color as your oval, now click on the 10th icon on the top of your page, (the second one underneath the word Text), to make sure that your letter "O" on top of your oval. Now click on the letter so that the arrows will appear all around it and stretch it a bit to make it larger.
Click on the letter and put right above your oval (that will make it easier to group them), now, while the arrows that select the "O" are still active, hold the shift key down and click on the oval. That will select both objects at the same time.
When they are both selected, go to Extensions, Generate from Path, Scatter. Click on the first two boxes, then click on Cloned, and then choose apply. Wait till it applies and now you see that you have an oval with an open scalloped edge. Click on the oval and while it is selected, go to Object, Ungroup. Then click on the open scallops, and go to Object, Ungroup. Now you see all the small “Os” around the oval. Now, holding the shift key down, stroke with your mouse to select all of the objects (the oval and the little circles must fit into the selection), then go to Object, Group. Now you can move the whole thing around, because it has become one object and it won’t fall apart when you move it.

Now go to File, Export Bitmap and export as a PNG file.
I like my images to be smooth, so I took my scalloped oval to Gimp and applied a simple blur.
Then saved it again.


You're done!
Now use in your image as I have done.

Bible Universe

How to make a scrapbooking tag in Inkscape


This tutorial assumes that you have at least a little bit of knowledge of this software and that you already have it installed in your computer. Inkscape is a free, readily available software that you can download from the internet.
Please, check out our previous tutorials to get some understanding of how the software works.

Fire up Inkscape.
Choose a color, I picked a peachy beige from the palette at the bottom of the page. Turn off stroke.
Click on the rectangle tool. And while holding down the shift key, draw a rectangle with rounded corners.
Make it with the following dimensions:
W: 1291.42
H: 708.571

Now click on the Ellipse or Circle tool. While holding the shift key down so that your circle will be even, draw a small circle.
Fill it with the same color as you picked for the rectangle and turn the stroke color off. Click on the arrow select tool and then on the circle
and move it so that it will be in the middle of the top of the label. Center it well.

Now click on the circle to select it, now holding the shift key down, click also on the label to select both objects, go to Object, Group, to turn them
into a single object. You can stop right there if you want and you will have a simple label that you can use.
You can leave it like that, or you can a apply any SVG texture you like. There are many free SVG textures online which you can download. Or you can open Gimp,
copy the tag that you have made in Inkscape, and paste it in Gimp and fill the tag with any pattern of your liking using the Bucket Tool in Gimp.
You can also apply some of the powerful Inkscape filters to your image. I will show you only two. Oilslick and Tartan. Only to give you an idea of what you can do. This will give you a glimpse of the possibilities.
Experiment until you get a label that you like!


............
Bible Universe