My Blog List

Showing posts with label digi scrapping. Show all posts

How to Make a Pretty Decorative Element in Inkscape and Gimp


Elements are a great part of scrapbooking. It seems you can never have enough of them!
This is an easy and pretty one to make.
Open Inkscape.
On the sidebar click on the ellipse or circle tool.
While holding down the Ctrl key, draw a circle (that way the circle will be perfectly round) any size you want your heart to be.
On the bottom of the page, to the left, right-click on Stroke, then on Edit Stroke. When the Stroke menu appears, click on the
X to delete the stroke around the circle. Only so that you can see it well, fill with a color of your choice by clicking on
any color on the palette below.

Now, let's make the edging around the element.
Click on the Text tool and write the letter "O" in caps. Click on the color you have chosen on the palette, so that the letter will get that same
color. The font I chose is Roller World BTN Bold Out, 144 pixels, Bold, but you can choose any Inkscape font that you like. With the arrow tool, click on the letter to select it, now click on it
again to rotate it, and rotate it so that the "O" will be upside down. Click on the "O" again to select it. Now, take a look at the toolbar on top of your page. Counting from the left, the 11th tool will raise
your object to the top, click on it.This will make sure that your decorative edge will not sink to the bottom of your element.
Now, while your "O" is still selected, press the shift key down and click on the circle to select them both.
When they are both selected, go to Path, Object to Path. Then go to Extensions, Pattern Along a Path and once the menu opens, select Repeated, Snake, Space between copies: 0.4
Leave everything else as is and click Apply. Let it calculate and render.
Now, hold the shift key down and create a selection that covers the whole thing. Go to Object, Group. Now you can move your circle without it falling apart.

Because Inkscape has the tendency to tile patterns, and I want to fill this element with a pattern that is seamless, we will go to Gimp and fill it up there.
So Go to File, Export and export your element as a PNG image.

Close Inkscape and fire up Gimp. Open your element in Gimp.
Click on the Bucket Tool. Select Pattern fill, and then, click on the little menu to choose any pattern you like. There are many free patterns for Gimp on the Net that you can
download and use. Once you have filled your element with your pattern, go to Script-Fu, Drop Shadow. Raise the Opacity to 80.0 and leave the rest as is and click Okay.
Now to go Filters, Blur. Once the blur is applied, go to Layer, Merge Down.
Now go to File, Save As, Select File Type by Extension and pick PNG, and replace your previous file.

Done!
Heaven Hell

Kitty Cat Journaling Block


I love cats and thought a cat head would make a cute journaling block and I had to try to make one! I did not have anything to go on, so I winged it.
Here is the way I was able to make it.
Start up Inkscape.
Choose the Ellipse tool. Make a circle, any size you like.
Now, choose the star tool, reduce the number of corners to 3 to really make a triangle.
Make a triangle.
Now choose any color you like and fill both the circle and the triangle with that color by clicking on them.
Duplicate your triangle or copy and paste it on the side of the circle.
Now, click on the triangle twice, when you see little arrows all around it, that is the rotate tool, turn the triangle sideways
until it is in a position that would make it look like a cat's ear on the side of your circle. Move the triangle so that it is
right next to your circle, no white line in between. Now click on the other triangle, click again so that the rotate arrows will
appear, rotate it in the opposite direction so that it will form the other cat ear. Place it on the other side of the circle, which
is your Journaling Block and the cat's head. Now Select the arrow tool at the top of your sidebar tools and stroke with your mouse
to select all the objects. Go Object to Path, now go Object Group.
All the pieces will be united into one.
Click to select and copy.


Now open Gimp.
Once Gimp is open, paste your cat head there. Go to Blur, Gaussian Blur and blur by 1 or 2 px.
Now go to Script-Fu and select Drop Shadow. Apply it.
Now change your Foreground color to #7b173f, which is a rich mauve and will show clearly with any pink. (By the way, the color that I chose for
my cat head is #ff2ad4. You can use that or change it to any color you like, before you add your journaling lines.
Select the pencil tool and choose the size Circle 11. Now, while holding down the shift key, click on the cat head where you want your first line
to be, draw the line and click on the end to finish it. Repeat as you wish.


You can leave it as is, or you can make it fancier.

Download from the internet any free texture you like for the theme you're using your cat journaling block for. I chose a pretty white and pink check
I have in Gimp. Once you download it, you must save your work up to this point as a PNG. Close Gimp. Go to your Computer, Program Files, then find
Gimp, and look in its files, depending upon your version of the software, until your find Patterns. Copy and paste the file into that folder or drag it into it.
Open up Gimp again and open up your work. Now, choose the Paint Bucket, then on the tools menu, pick Pattern Fill and choose the one you want.
Apply the Bucket tool to it.


Now you can make the Mauve lines again if you want to and it will be pretty enough.
But I want it cuter. So I went back to Inkscape, because this type of thing I find it easier to make over there.
I opened up the program, chose File, then found my kitty cat head and chose Embed.
It came right up. Then I made a circle in a hot pink. Right clicked on Stroke, once the stroke menu opened, I chose Edit Stroke, changed the stroke color to white, then I picked some dashes that I thought would look nice, and raised the width to 6.000
and my circle had pretty white dashes all around and it looked as if it had been stitched. I dragged into the kitty cat head and centered it. Exported it as a PNG.
You can write on it as it is, but I wanted some lines, so I opened up Gimp again and wrote my journaling lines there as we did with the first example.

Hope you liked this tut!


..........
Everlasting Happiness

Caterpillar Decorative Journaling Tag


I just came up with this tag today. Never have seen a caterpillar tag, but this looks like a caterpillar to me, so the name stuck. Scrapbooking is a creative activity so something as fun as a caterpillar journaling tag or label is a natural!
Open Inkscape.
Choose the Ellipse or Circle tool, make a circle any size you want.
Select a color you like and fill it with it. Right click on stroke (below the palette at the bottom of your screen), when the menu opens,
choose Edit Stroke. Then when the new menu opens, click on the little "X", so that your circle will have no stroke. Close the menu.
Now duplicate your circle twice. Move the second circle to be just below the first circle, and a little bit into it, then repeat with the thrid circle.
Click on the first circle to select it, go to Path, Object to Path. Select the second circle, and go to Path, Object to Path, repeat with the Third Circle.
Now click on the select tool (the black arrow at the top of your vertical toolbox) and select all three objects. Now, with the tree circles selected, go to Object, Group.
Now, we have our caterpillar.
Go to File, Export Bitmap and give it the name Caterpillar Journaling Tag. It will export as a PNG file.

We can do a lot more things on Inkscape, but I want to do some things in Gimp.

Now open up Gimp.
Open the caterpillar image.
For your Foreground color, choose #e7b0b0
Choose the pencil tool and the size Circle 07
Now, holding the shift key down, click where you want the first line for the journaling to appear, stretch your line across the ball
that forms the head of the caterpillar and click to finish the line. Repeat as many times as you like.
Click on the Pencil tool again and choose a pencil size, then click on the eraser tool and make a hole at the top of the caterpillar
head. Now to to Script-Fu and choose Drop Shadow, apply it leaving the settings as is.

If you want to, go to Bevel and Emboss, and choose Inner Bevel, give it a Depth of 10, Direction Up, Size 10, then leave the rest as is. Click okay.
Export as a PNG again.
That is it!

Variation: You can use the bucket tool and fill your caterpillar with any texture that you like. There are thousands of free textures for Gimp online!

..........
Everlasting Happiness

Pretty Decorative Element for Scrapbooking


This is a different version of our previous tutorial which was so much fun and has been so popular!
Open up Inkscape.
Choose the ellipse or circle tool and Make a oval (770.196 w x 1359.67) or any size you like, hold down the Ctrl key as you make the shape so that it will have a perfect form. Make sure that it is vertical.
Choose a color from the palette at the bottom of the page, I will choose a nice happy lime green because that matches a photo I will be using it in. Click on the oval to fill it with the color. Now right click on stroke at the bottom palette toward the left of the page, and when the menu appears, click on the “X” to choose no stroke.
Now click on the Text tool and type anywhere on the working area the capital letter V. You can choose any font you want. I picked ZapfHumnst Ult BT and for the font size I chose 144.
Click on the letter to make it the same color as your oval, now click on the 10th icon on the top of your page, (the second one underneath the word Text), to make sure that your letter "V" on top of your oval. Now click on the letter so that the arrows will appear all around it and stretch it a bit to make it larger. Now, click on the “V” again to select it, and click for a second time, little arrows will appear that indicate you can rotate the letter,
Grab one of the corner arrows and rotate the letter so that the “V” is upside down, that is how we need it for our decoration.
Click on the letter and put right above your oval (that will make it easier to group them), now, while the arrows that select the "V" are still active, hold the shift key down and click on the oval. That will select both objects at the same time.
When they are both selected, go to Extensions, Generate from Path, Scatter. Click on the first two boxes, then click on Cloned, and then choose apply. Wait till it applies and now you see that you have an oval with an open scalloped edge. Click on the oval and while it is selected, go to Object, Ungroup. Then click on the open scallops, and go to Object, Ungroup. Now you see all the small “Vs” around the oval. Now, holding the shift key down, stroke with your mouse to select all of the objects (the oval and the little circles must fit into the selection), then go to Object, Group. Now you can move the whole thing around, because it has become one object and it won’t fall apart when you move it.

Now go to File, Export Bitmap and export as a PNG file.
I like my images to be smooth, so I took my scalloped oval to Gimp and applied a simple blur. If you want to add a drop shadow, add it by adding a layer, then going to ScriptFu and add Drop Shadow. Then saved it again.
Done!

Bible Universe

How to Make a Scalloped Oval Digi Scrapbooking Element in Inkscape


This tutorial assumes that you have both Inkscape and Gimp installed on your computer, and that you have followed at least some of our previous tutorials to
get an idea of how the free software works.

Open up Inkscape.
Choose the ellipse or circle tool and Make a oval (770.196 w x 1359.67) or any size you like, hold down the ctrl key as you make the shape so that it will have a perfect form. Make sure that it is vertical.
Choose a color from the palette at the bottom of the page, I will choose a pale purple because that matches a photo I will be using it in. Click on the oval to fill it with the color. Now right click on stroke at the bottom palette toward the left of the page, and when the menu appears, click on the “X” to choose no stroke.
Now click on the Text tool and type anywhere on the working area the capital letter O. You can choose any font you want. I picked Rockwell Extra Bold and for the font size I chose 144.
Click on the letter to make it the same color as your oval, now click on the 10th icon on the top of your page, (the second one underneath the word Text), to make sure that your letter "O" on top of your oval. Now click on the letter so that the arrows will appear all around it and stretch it a bit to make it larger.
Click on the letter and put right above your oval (that will make it easier to group them), now, while the arrows that select the "O" are still active, hold the shift key down and click on the oval. That will select both objects at the same time.
When they are both selected, go to Extensions, Generate from Path, Scatter. Click on the first two boxes, then click on Cloned, and then choose apply. Wait till it applies and now you see that you have an oval with an open scalloped edge. Click on the oval and while it is selected, go to Object, Ungroup. Then click on the open scallops, and go to Object, Ungroup. Now you see all the small “Os” around the oval. Now, holding the shift key down, stroke with your mouse to select all of the objects (the oval and the little circles must fit into the selection), then go to Object, Group. Now you can move the whole thing around, because it has become one object and it won’t fall apart when you move it.

Now go to File, Export Bitmap and export as a PNG file.
I like my images to be smooth, so I took my scalloped oval to Gimp and applied a simple blur.
Then saved it again.


You're done!
Now use in your image as I have done.

Bible Universe

New Sculpted Badge for Your Blog, Store or Website


This tutorial assumes that you have already gone through our last tutorial and learned the basics of Fill and Stoke in Inkscape. Please, take a look at previous tutorials here to be able to prepare for this one. You must have Inkscape and Gimp installed in your computer to be able to make this badge. You can get them for free!

This one has a 3D kind of quality to it and it just as easy as the previous one.
Open Inkscape. Choose a color (I picked a medium pink, but follow your own taste), click on the ellipse or circle tool and while
holding the Ctrl button down, make a circle of a size you like. Click on the stroke at the left side of the bottom of the page.
Choose Edit Stoke and change the color of the stoke to red (or a darker color for you) choose a decorative stoke you want and apply it.
Make a smaller circle also holding the ctrl key so that it will come out perfectly round. Fill it with a darker shade of the previous color,
and change the stroke to white and to a different stroke paint. Apply.
Now Export your file as a bitmap (a PNG) take it to Gimp.
Open up Gimp. Open your file. Now Go to Script-Fu, Bevel and Emboss.
For your style choose Inner Bevel.
Depth: 20
Direction: Up
Size: 15
Highlight color: White
Shadow color:black
and leave the rest as is.
Click Ok and wait for it to apply the bevel.
This will give your badge that almost geometric edge that it has.
Go to Layers, Merge down.
Then save as, select file type by extension and pick PNG.
Now go back to Inkscape.
Open the badge.
Choose star, select a darker pink for the Fill and a light pink for the Stroke, and do not choose a dotted stroke, but a straight line stroke.
For your star's corners, choose 30, spoke ratio: 0.752, leave rest as is.
Center your star in the middle.
Now click on the text tool and write anything you want.
Go to Edit, Copy and Paste, to reproduce the text. Change the second bit of text to white.
Click on the black arrow and move the white text on top of the black one. Now click on the canvas to deselect and click on the arrow again.
Select all the text and to to Object, Group. Now click on the text and move it to the center of your badge.
Export as Bitmap again.

Done!

..............
The Hand of Trust

How to Make a Cute Round Sticker in Gimp for Your Site or Scrapbooking


Fire up Gimp.
Create a new image, any size you like, mine is 640 x 400. Click on Advanced options and choose Transparent. Click OK.
Pick the Ellipse tool. Draw a circle.
Position 193 x 70
Size 262 x 244
Fixed Aspect ratio
Make sure Antialiasing is checked
Choose White as your Foreground color (#ffffff) and clicking on the bucket tool, fill the selection.
Now change the Foregound color to a nice red (#c40606)
Go to Select, Border, choose 5 pixels and click OK.
You will see a marching ants border, with the bucket tool, click inside that border and the color will be applied. If you
want it a bit thicker, click again. If you want to, add a drop shadow to your sticker, by going Filters, Light and Shadow,
Drop Shadow.
Go to Select and choose None.
Now go to Filters, Render GFig.
Once the menu opens, change the color of the stroke by clicking on it. We will choose a nice blue #0606c4, click OK.
Now in the GFig menu, choose Star (at the top of the menu), increase the sides to 5 and working in the image that appears in the
same GFig menu, make the star inside the sticker. Click close.
Go to Filters, Blut, Gaussian Blur and blur by 3.
Now change your Foreground color to Black or to #050606. Choose the text tool, select the font Rockwell Bold, size 35.
Click inside your stamp and write the words: A Cut Above.
Go to Layer, New Layer.
To make the text a bit fancier, change your Foreground color to #f6240d. Go to the text tool again but reduce the Rockwell Bold to 34.
Click on top of the letter A and begin writing the text again. With the mouse, move the selection into place so that it almost covers the black
letters, leaving a bit to be seen as a shadow.
Go to Filters, Blur, Gaussian Blur. Save as a PNG.

Experiment with your own colors and if you want, insert a small dingbat into your stamp. Give it color. Write a message on it. Have fun!

..........................
The Key to the Storehouse

How to Make an Easy ribbon in Gimp


Fire up Gimp.
Create a new image size 1000 x 1000, choose Advanced Options, Transparency.
Now choose the Rectangle tool and create a selection that has the following settings:
Position 9 x 316
Size: 998 x 208

Click on the Foreground color and change it to #f69e64. Click Ok.
Select the Bucket tool and fill your selection with the color.
Go to Layer, New Layer.
Go to Select, Shrink and shrink your selection by 4 pixels.
With your FG color set to #f69e64 and your BG color set to White, click on the Blend tool, click on the little arrows so that the White color will be the first color in the gradient,
and choose FG to RG (RGB) Gradient, stroke with your mouse straight down to make your gradient.
In the Toolbox, right click on the top layer and then choose merge layers.
Go to Select, Shrink and shrink by 1 pixel.
Then got o Select, Invert.
Go to ScriptFu, Layer Effects, Satin. And choose the following settings:
Opacity: 75.0
Blanding Mode: Soft Light
Clor: Black
Offeset Distance: 11.0
Size: 14
Contour: Linear
Check :Invert
And check Merge with Layer, then click Ok.

Save as Png image
Done!

................
Moving Mountains. . .

How to make a Post It note in Gimp


We will make two different examples of a Post it note, which you can use to add little messages to your blog or website, even to your sales page!
Fire up Gimp.
Create a new image (640 x 400 will do), in Advanced Options, choose Background Transparency
Take the Rectangle Select tool and create a square selection (Position 125 x 26 and for size: 382 x 340 Fixed: Aspect Ratio)
Now, click on the bucket tool to select it and then click on the Foreground color to change it. Most people make their Post It notes Yellow, I personally like them in colors, so I will use another color. I will use color #a4f0a5, which is a lovely Mint hue. Once you have chosen your
color, click on the bucket tool and fill your selection with that pretty Mint green. Make sure your opacity is 100% and the Mode is Normal.
Now go to Select, None.
Now click on the Rotate Tool in the Toolbox (the fifth from the left) and once you have selected it, click in the center of your Post It note,
and a little dialog box will appear. Now, where it says Angle, write simply -7 and click rotate.
Click on Shift + D to select the Dodge and Burn tool, choose the brush size Circle 19, Scale 100% and Exposure 50.0, click on Burn and Midtones in the Dodge and Burn dialog box in the
Toolbox. Click on Shift to make a straight line and holding shift down, make a line across the top of the Post it.
Using the Lasso tool and working as straight as you can, make a square selection that is a little bit inside the Post It and a little bit outside. Change your Foreground Color to #585858,
and, selecting the Bucket tool, choose an opacity of 100% and fill the selection with the color. Then go to Filters, Blur, Gaussian Blu5, and set the blur to 5.0
Then go to Select, None. Now choose your text tool and write whatever you want on your Post It note, rotating it a bit to fit the direction of your note, until you have just right, where it looks natural.

Create a new image (640 x 400 will do), in Advanced Options, choose Background Transparency
Take the Rectangle Select tool and create a square selection (Position 125 x 26 and for size: 382 x 340 Fixed: Aspect Ratio)
Now, click on the bucket tool to select it and then click on the Foreground color to change it to e8adcf and click on the bucket tool. Fill your selection with this pretty pink.


Click on Shift + D to select the Dodge and Burn tool, choose the brush size Circle 19, Scale 100% and Exposure 50.0, click on Burn and Midtones in the Dodge and Burn dialog box in the Toolbox. Click on Shift to make a straight line and holding shift down, make a line across the top of the Post it.
Now go to Filters, Distorts, Pagecurl. Filters, Blur.
If you want to, you can write something in the little piece of paper that is left after the curl.


..................
God can Provide


How to Work on a Page


The most important thing to understand about scrapbooking is that it is worked in layers. Now, the problem is that most newbies do not understand how that is done. They get confused and frustrated and think they will never be able to make a single page and often, they give up!
Regardless of which software you use for your digital scrapbooking, the steps are the same.

What you need to understand is the order of placement.
Here is it:
Once you have decided to make your page and you have the photos you want to scrap picked out, and have decided on the colors, papers and elements you are gong to use, you need to begin to work IN ORDER.

1- Create your new document and lay down your paper or background.
2- Create a new layer and add a smaller piece of paper (a circle, a triangle, a star)
3- Create a new layer and add your photos
4- Create a new layer and add any frames or embellishments that go around your photos
5- Create a new layer and add a journaling tag
6- Create a new layer and add text to your journaling tag

Merge all your layers down and save!

It is as simple as that! Here is a page that was created following these steps.

Make sure that all your decorative elements and embellishments have a transparent background before you layer them together, so that you can stack them properly.

Let the colors in your photo or photos dictate some of the choices you make when it comes to colors, shapes, papers, elements and embellishments. Make it spontaneous and fun!

..........................

Bible Prophecy Truth

Holiday Embellishment in Gimp


Make this nice looking Holiday embellishment in Gimp! The steps are pretty easy.

Open up Ginp. Make a new image, 640 x 480 in size.
Choose the Ellipse tool and make a selection that has the following Size: 242 x 231 (Don't worry about the position right now.) If you don't draw it
Choose the Gradient or blend tool, and choosing Golden gradient and stroking diagonally with your mouse, fill the selection.
Go to Layer, New Layer.
Then go to Select, Shrink, and when the menu opens, shrink by 20 px.
Now go back to the Blend or Gradient tool, click on the gradient symbol in the Toolbox and change it to FG to BG (RGB), now change the Foreground color to
#308014 and the Background color to #00C957.
Make a Linear gradient by stroking sideways diagonally from top to bottom of the selection.
Go to Script-fu and choose Bevel and Emboss, when the menu opens, change the style to Emboss, click ok to the regular settings.
Go to Layer, New Layer.
Go to Select, Shrink, and when the menu opens, shrink by 25 px.
Change your Foreground color to #ff0502 and Background color to Black.
Make another diagonal Gradient as before, with the new colors.
Go to Ecript-fu and choose Bevel and Emboss, when the menu opens, change the Style to Emboss and the depth to 10, click OK.
Go to Layer, New Layer
Select, Shrink,and shrink by 10 px.
Change your your Foreground color to Black and your Background color to White.
With the Bucket tool, fill the new selection with Black.
Now change your Foreground color to #ef9e11
Click on the Text tool and choosing the Arial Bold font and writing in and size 53, write the letter JOY, typing a space in between letters, right about
the middle of our selection.
Now go to Script-Fu, then Bevel and Emboss, change the Style to Inner Bevel. Adjust the following settings:
Depth: 10
Size: 10
Move the levers of the Highlight Opacity and of the Shadow Opacity to 100
and select Merge with Layer.
Click OK.
Change the Foreground color to # ff0502 and your Background color to Black. Click on the Gradient tool and choose FG to BG (RGB)
Select the Pencil tool, and in the Toolbox, choose the Brush Circle 19, for the Stroke size of the Pencil, and choose Use Color From Gradient.
Press the Shift Key while you draw your line.
Now click on the Rectangle tool, and draw a selection a little bit wider than your red line, 50 x 16 in size would be nice.
Fill it with the Golden gradient we used before.
Now go to Select, None.
Then to Layer, Merge Down.
then to File, Save As Select File Type (By Extension) and choose PNG.

That's all!

.................

Shimmering Stone in Gimp


Fire up Gimp.
Create an image 400 x 600
Choose the Ellipse selection and draw a selection.
Position: 150 x 65
Size: 278 x 230
Change Foreground color to #444444, click OK. Select Bucket tool and fill selection with this color. Make sure the Background is White.
Click on the Blend or Gradient tool and, choosing a Linear Gradient, with an Opacity of 100%, and clicking on Adaptive Supersampling so
that your gradient will be really smooth, make sure your gradient goes from dark to light and stroke with the mouse downward to fill the
selection with the gradient.
Change the Foreground color to #fc00fc
Choose the Brush tool, and select Circle Fuzzy (19)
And click on the selection once.
Change the Foreground to #e7d7d6 and click on the selection once.
Change the Foreground to #fca424 and click on the selection once.
Change the Foreground to #24df47 and click on the selection once.
Change the Foreground to #1c0fff and click on the selection once.
Change the Foreground to #ff370f and click on the selection once.
Change the Foreground to #ce0c1f and click on the selection once.
The place where you make those clicks is up to your taste, but leave some of the gray visible.
Go to Filters, Map, Illusion. When the little menu opens, choose Mode 1, Divisons: 12 anc click Ok.
Go to Layer, New Layer. Create a new Ellipse selection with a Position of 183 x 105 and a Size of 212 x 158.
Change Foregound color to #ff370f and choosing the Gradient tool, and making sure your Background color is White and
that the direction of your Gradient goes from dark to light, stroke with your mouse to create a Linear gradient to fill the new
selection.
Go to Scriop-Fu, choose Inner Shadow, and when the menu opens, make sure the color is Black, raise the Opacity to 80.0
Size: 10 Blending Mode: Half Round
Source: Edge
Offset Distance: 5.0
And leave the rest as is.
Go to Script-Fu: Bevel and Emboss
Style: Outer bevel
Direction: Up
Highlight Color: White
Shadow Color: Black
Highlight Opacity: 75.0
Shadow Opacity: 75.0
Surface Contour: Half Round
Got o Layer, New Layer.
Choose #ff370f as your Foreground color again and the Brush tool and select Circle Fuzzy (19) and click once on the upper
right corner of the inside of the current center ellipse.
Change the Foreground color to #f9e8e7 and click in the selection once at the lower right portion of it.
Make another small ellipse selection towards the left of the selection, fill with #ffffff.
Go to Filters, Blur, Gaussian Blur, raise it up to 60.0 and click Ok. Repeat.
Go to Script-Fu
Outer Glow
Select size: 10
Color #ffffbe
Contour: Ring
Opacity: 75.0
Click Ok

Go to Filters, Light and Shadow, Sparkle. When the little menu opens, choose the following settings:
Luminosity threshold: 0.001
Flare intensity: 0.55
Spike length: 20
Spike points: 5
Spike density: 1
Select Preserve luminosity
Natural color
Leave the rest as is. Click OK
With the Ellipse tool, make a selection on top of the little flare and then go to Blur, Gaussian Blur, and blur it to
15 px.
Go to Filters, Blur, Gaussian Blur, and blut to 5.0. Repeat.
Go to Save As, and Choose Advanced Selection and Save as a PNG.


.................
Bible Universe

Make an Embossed Beginners Button or Scrapbooking Brad in Gimp


If you have not yet installed Gimp, please do, it is FREE.
Once installation is completed, open Gimp.
Create a New Image 700 x 700 in size, 72 ppi. Click on Advanced Options, and choose Fill with Transparency. Click OK.
With the Ellipse selection make a circle, and choose the following settings:
Position: 166 x 12
Size: 373 x 373
Go to the Toolbox and change your Foreground color to 99686B (a gray) and leave your Background as White.
Click on the Gradient tool, choose Linear, 100% Opacity, also click on Dithering and Adaptive Supersampling.
Stroke with your mouse from top to bottom to make the gradient, making sure the top is darker than the bottom.
Go to Layer, New Layer. Go to Select, Shrink and Shrink the new selection by 15 pixels, click OK.
Change the Foreground color to 1E1B12 and the Background color to CEBCBC. Select the Gradient tool again and leaving everything as before,
make another gradient.
Go to Script-Fu, Layer Effects, Inner Glow. When the little menu opens, select opacity 75.0
Contour: Linear, Size: 10.0 and leave the rest as is. Click OK.
Go to Layer, New Layer. Then to Select, Shrink and shrink by 20 pxls.
Change the Foreground color to 8F0401, and the Background color to f20000 and make another gradient.
Go to Layer, New Layer and shrink it also by 20. Change color to f20000. Change Gradient to Foreground to Transparent and make the new
gradient fill. Go to Script-Fu, Layer Effects, Bevel and Emboss and choose Pillow Emboss and click OK.
Make a new layer, shrink selection by 10 px, change gradient to FG to BG (RGB)and fill new selection.
Go to Layer, new Layer, then go to Script-Fu, Bevel and Emboss, and choose Inner Bevel. Click Ok.
Change the Foregorund color to ffffff. Go to Brush, and choose Circule Fuzzy 19, move the scale lever to 10.0, Opacity 50.5 and click twice at the bottom
of the button.
Go to Filters, Blur Gaussian Blur and choose 10.0 px, and click OK.

Save your button as a PNG by choosing Save As, then Select File (By Extension and scrolling down to the PNG format.)


Done!

Experiment with your own color choices and have fun!


.............
Bible Universe

Amber and Gold Button or Brad


This one is really easy to make and pretty too! You will be working only on Gimp, so if you have not installed the software, begin by installing it, it's free.
Open Gimp
Create a new File, size 640 x 480 or any size you like.
Go to the Toolbox and click on the round Ellipse Selection tool and draw a circle.
Click on the Gradient or Blend Tool. Scroll on the Blend Menu options and select Brown Gloss for your Gradient.
Choose Linear, Dithering, and 100% Opacity. Make your gradient fill with the stroke of your mouse downward.
Go to Layer, New Layer. Go to Select, Shrink, and when the menu opens, shrink the new selection by 10 pxls.
Return to the Gradient or Blend menu and choose a new Gradient: Gold. Stroke with the Mouse to fill in the new selection
with the gradient.
Go to Script-Fi, Color Overlay. When the menu opens, click on Color and choose the following Hex number: ff3131; Blending Mode: Soft Light, click OK. Let it render.
Return to Script-Fu, Layer Effects, and choose Bevel and Emboss. When the menu opens, make the following selections:
Style: Pillow Emboss. Direction: Up. Size: 10. Gloss Contour: Linear. Leave rest as is. Click OK.
Go to Filters, Light and Shadow, Drop Shadow, Offset X: 8, Offset Y: 8, Blur Radius: 15, Opacity: 80, leave rest as is.
Go to the Toolbox, and change your Foreground color to White. Click on the Brush tool and choose the brush Circle Fuzzy (19), and leave all other settings as is.
Click on the lower side of the button to make a glow spot. Go to Script-Fu, Layer Effects, Inner Glow.
Go to Filters, Light and Shadow, Drop Shadow.
Go to Filters, Blur, Gaussian Blur and only blur to 2 pxls.

Save as, Select file by Extension, and save as a PNG image.

Done!


.............
Who Do You Think You Are?
(You are more special than you think!)

Inter-Connected Button or Scrapbooking Brad Fun


I like to make things my own way. And since I have Paint.Net, Gimp and also Inkscape, why not combine them?
My forte is not drawing with a mouse, so I when I realized that I could make shapes in Inkscape, cut and paste them in Paint. Net or Gimp
(or in one after the other) to embellish them, I thought that soved a great problem for me!

Let me share with you this simple tutorial,it might solve a problem or two for you and you might find it fun also.

First of all, download the three softwares to your computer, they are all FREE.
Once you have them, open up Inkscape and Paint.Net.

Now go to Inkscape. Choose the Polygon drawing tool (it's the one that is seen together with a star shape), and at the top of the page, go to Corners, and write the number 12,
spoke ratio: 0.638, leave the rest as is and leave stroke unset. Choose a color you like. Stroke with your mouse to create the polygon, the size you
want. Once made, click it to select it and go to Edit, copy or cut.

Move to Paint.Net. Click on Edit, Paste in to New Image.
Once the Polygon appears in your working space. Make sure the colors chosen on your toolbox are Foreground Teal, which is Hex #008080, Backgroung White.
Click on the Paint Bucket, then at the top of the page, click where it says Fill, scroll down to Wide Downward Diagonal pattern, and fill the polygon with teal and White diagonal lines.

Go back to Inkscape and make another polygon, smaller than the first. Copy.
Return to Paint.Net, Click on Layers, Add New Layer, then paste your new Polygon, making sure you center it well. Make the color for this one Hex #008080, a nice teal.
Click on Layers, Merge Layers down.

Now to to Effects and blur. I have downloaded many effects for my Paint.Net (there are tons of free ones!) you can use Average Blur, but do not set it to more than 2 (Gaussian Blur would "delete" your stripes by blurring them too much).
Save as an Optimized PNG. If it tells you that the image will be flattened, click OK.


For the rest of the button, you will need a texture. there are hundreds you can get online that can be used both by Gimp and Photoshop. Download a texture package that you like.
Save it to your desktop. Then go to My Computer, Program Files, and look for Gimp, open folders until you find Textures, open your download and simply copy and paste the texture (or textures) you want into that
folder. This hast to be done with Gimp closed. Now that you have your texture in place. Close Program Files, My computer and go to Gimp.

For my texture I chose my own thing, a polka dot pattern photographed from a fabric. You can do that too. You can buy swatches (they call them Fat Quarters) used for quilting, and you can use them as backgrounds.

Go to Gimp, open your PNG image in Gimp.

Once the image opens, click on the Ellipse Selection tool and draw a selection. The Position should be 158 x 158, the Size: 449 x 444, Fixed Aspect Ration should be selected, also Antialiasing
should be selected.
Now, in the Toolbox, click ont he Foreground color, (it is usually Black) Change your Foreground color to Hex # 00f9f9, which is a light aqua. Leave your Background color white.
Go to Layer, New Layer. Choose the Bucket Fill tool and go to Pattern Fill and click it, scroll down to the pattern you want and Fill the selection with your image. Mine was pink and white so I clicked on it
with the Bucket Fill tool and made it that light aqua. If you need to do that, do it. It's okay if the color contrasts, also. Yellow would look lovely.
Now go to Select, Border, and make it a bit wide, and select feather border. Click OK. Then go to Select, None.

I went back to Paint.Net and Added a Drop Shadow. To be able to do that, you need to download the Effects package and install it as you did for your Gimp textures, in Paint.Net's Effects folder.
Then you will find it under Effects, Object, Drop Shadow. To finish, go to Effects, Blur, Gaussian Blur and choose only 2. Click Ok. Save and your done!

Warning: Color bleeds a little bit from the stripes, but this is only to show you how you can make up for any clumsiness in mouse drawing by going back and forth between software programs.

Inter-connecting software packages to get the most out of them as you learn to use them is fun. Try to see what you can come up with!

........................

Do You Feel Mistreated?

Easy Pink Brad or Button in Gimp


This is a pretty nice button or scrapbooking brad for a beginner. It looks really well, which will encourage you to experiment more with the wonderful software.

Open up Gimp.
Create a new image 269 x 272 pixels, background color Transparency, Resolution 96.00. For your Foreground color, choose # A22828, for your Background color, choose # FF8770.

Click on the ellipse or round select tool and from the top corner of the canvas, drag a selection down to cover almost the entire canvas.Click on the blend or gradient tool and make sure
the arrows of the gradient are such that will give you a gradient that is darker at the top than at the bottom. Gradient Shape should be Linear, Opacity should be 100%, click on Dithering and also on Adaptive Supersampling, to make the gradient smoother. Pull the mouse on a straight line across your selection to fill it with the
gradient. Go to Select Shrink. Shrink it to 15 pixels. Click OK. Now go to Script-Fu, Inner Shadow and choose the following settings: Opacity 26.0, Contour: Linear; Blending Mode: Normal.
Source: Edge. Choke: 0.0; Size 5.0; Offset Angle: -90.0;Offset Distance: 2.0. Click OK. Create a new layer and name it Center. Shrink it as before but this time by 10 pixels. Click on the arrows of the
gradient tool so that the colors will run in opposite direction as before and fill the new selection, lighter on top and darker at the bottom.
Go to Script-Fu, Inner Glow, then choose the following settings: Opacity 54.0 and leave the rest as is. Click Ok.
That's it! Simple, isn't it?
Practice and add whatever changes you like best.

Here's a sample page using this brad or button to give you ideas:


...................
Bible Universe

Softly Striped Green Paper in Gimp


Fire up Gimp. Go to New and select the size you want for your image. I will choose 640 x 480 for the sake of making the image
easy to load.
Now go to Filters, Render, Clouds, Difference Clouds. When the menu opens, leave the settings as they are and click OK.
Now go to Filters, Blur, Pixelate. Wait till it renders.
Now to Filters, Blur, Motion Blur. When the menu opens, choose an angle of 90 degrees and a length of 999. Click OK. Let it render.
You will begin to see stripes.
Go to Color, Colorize. When the menu opnes, move the Hue lever to 148. Click ok. Now you have a nice green.
Create a new layer. Choose the Rectangle, Select tool, then Select the picture, in the Select Tool menu, choose Feather edges, and set the feathering to 30.
Then go to Select, Invert. Choose Black as the Foreground Color and then go to Edit, Fill with FG Color (Black).
Create a new layer. Go to the Gradient Tool. Keep the Linear Gradient chosen. Choose Opacity 60.0, And set the Gradient FG to Transparent. Select Dithering. And now, draw the gradient
by pulling with the mouse from the top to the bottom of your paper.
Now to go Select, None. Then to Layers, Merge Down Layers.

Now you save it as a PNG, because it has the best quality, and you are set to use it however way you want it!
.............................

Determining the Will of God

How to Make Scrapbooking Papers in Gimp---Part 2


There are many, many filters and brushes for Gimp online. Most of them are free. You can Google to find them and install them in your computer.
They will allow you to make quite a bit of nice things with this software!


For another paper, click File New, and choose any size of paper you want. For the sake of expediency in photos, I will continue to choose 640 x 480.
Go to the Toolbox and click on the Foreground color, we will be choosing a lovely shade of pink, #EE3A8C. Now, click on the bucket fill tool and
fiull your paper with this pink color. Now go to Filters, Artistic, Clothify. When the menu opens, choose Blur X: 10, Blur Y: 10, leave the rest as is.
Click Ok. Now you have a textured paper! Save as a PNG file (to do this, choose Save As, then Select File Type by Extension and scroll down to PNG) and use as you want!


Here are some examples of scrapped pages that incorporate the paper made above into the design.


Your creativity is your only limitation! Enjoy!


.................
God Loves You!

How to Make Your Own Scrapbooking Papers in Gimp---Part 1


Fire up Gimp. Go to New and choose the size of paper you want. Because this is only a photo illustration,
I personally chose 640 x 480. Click ok.
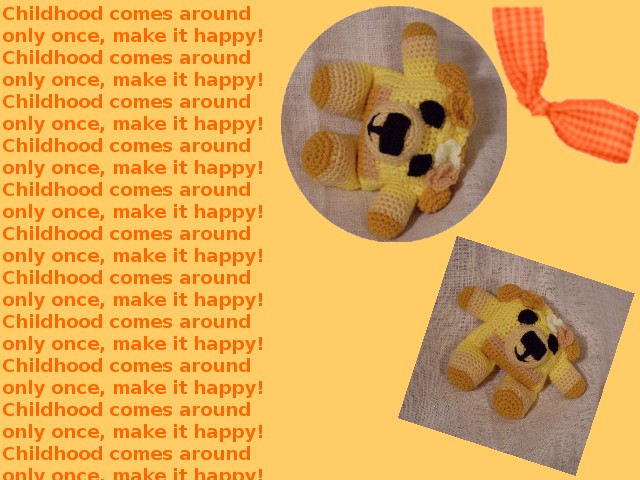
Now go to the Toolbox and click Foreground color, choose #FFCC66, click ok. Select the Bucket Fill Tool, and fill the
paper.
Go to Layers, create a New Layer, make sure Transparency is selected.
Go to the Foreground color again and choose #FF6600. Select the Text Tool choose Sans Bold as a font (or any font you like best)
Click on the paper area and when the text dialog box opens, begin to write the following text: Childhood comes around only once, make it happy!
(I wanted to leave the rest of the paper free so I divided the text but you can write whatever you want and you can do as your taste indicates.)
Go to Layers, choose Merge Down Layer. Then Save the image as a PNG file with the name you want.

Here is an example of how I used this paper:


.............

God Loves You!

How to Make a Heart in Gimp


There are many free Gimp tutorials online that teach how to make a heart. I will share a couple here. But there is one step not included in the first tutorial and that is how to make a brush in Gimp.
To make a heart brush in Gimp (to make a shape like a heart that you can use by just choosing the paintbrush tool and find the heart in its toolbox), you first have to get yourself a heart dingbat. Just Google get free heart dignbat and you will find lots of places where you can download a free dignbat. You can also get some free dingbats at http://www.scrappingtable.com/dingbats.html

Open it in Gimp. Then save it as a brush by choosing Saves As; Select File by Type (By Extension), then choose Gimp Brush.
Name your brush. Then save it. It will usually save to your Desktop.
Now, you go to My Computer; Program Files; Gimp and you look for the folder that says Brushes, you open it, and then, leaving this folder open, you go to your Desktop, find the brush, and you copy and paste it into the Brush Folder.
When you fire up Gimp, it will appear in the list of brushes in your toolbox, when you choose the paintbrush and look in the brushes available in the menu below. Having this dingbat brush is crucial to be able to make the pretty 3D heart in the next tutorial, which will give you a wonderful, professionally looking result!

If you are interested in making the satin heart in the above illustration. It is simple to make. And you can make it as follows. First make your satin texture in any color you like, following our previous tutorial. Save it under a name of your choice. Then, choose File; New; Size of image of your choice (300 x 300 is nice)
Choose your dingbat brush, make your heart, click on the bucket fill tool, in the toolbox, find the satin texture and pour it into the heart with the bucket fill. Then go to Filters; Light and Shadow; Drop Shadow.
Rotate your heart if you want to. That is all it takes!


After that, you can scrap your heart. If you want to change it a bit, you can add noise so that it would look a bit "sandy", like this one:


For another neat heart with a 3D feel to it, check out this free tutorial!
How to Make a 3D Effects Heart in Gimp

..................
When You Need to Have Strength. . .