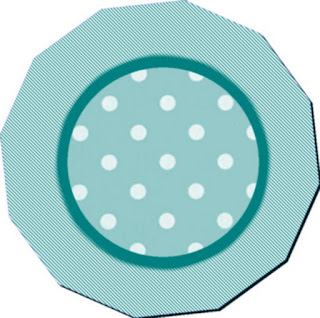
I like to make things my own way. And since I have Paint.Net, Gimp and also Inkscape, why not combine them?
My forte is not drawing with a mouse, so I when I realized that I could make shapes in Inkscape, cut and paste them in Paint. Net or Gimp
(or in one after the other) to embellish them, I thought that soved a great problem for me!
Let me share with you this simple tutorial,it might solve a problem or two for you and you might find it fun also.
First of all, download the three softwares to your computer, they are all FREE.
Once you have them, open up Inkscape and Paint.Net.
Now go to Inkscape. Choose the Polygon drawing tool (it's the one that is seen together with a star shape), and at the top of the page, go to Corners, and write the number 12,
spoke ratio: 0.638, leave the rest as is and leave stroke unset. Choose a color you like. Stroke with your mouse to create the polygon, the size you
want. Once made, click it to select it and go to Edit, copy or cut.
Move to Paint.Net. Click on Edit, Paste in to New Image.
Once the Polygon appears in your working space. Make sure the colors chosen on your toolbox are Foreground Teal, which is Hex #008080, Backgroung White.
Click on the Paint Bucket, then at the top of the page, click where it says Fill, scroll down to Wide Downward Diagonal pattern, and fill the polygon with teal and White diagonal lines.
Go back to Inkscape and make another polygon, smaller than the first. Copy.
Return to Paint.Net, Click on Layers, Add New Layer, then paste your new Polygon, making sure you center it well. Make the color for this one Hex #008080, a nice teal.
Click on Layers, Merge Layers down.
Now to to Effects and blur. I have downloaded many effects for my Paint.Net (there are tons of free ones!) you can use Average Blur, but do not set it to more than 2 (Gaussian Blur would "delete" your stripes by blurring them too much).
Save as an Optimized PNG. If it tells you that the image will be flattened, click OK.
For the rest of the button, you will need a texture. there are hundreds you can get online that can be used both by Gimp and Photoshop. Download a texture package that you like.
Save it to your desktop. Then go to My Computer, Program Files, and look for Gimp, open folders until you find Textures, open your download and simply copy and paste the texture (or textures) you want into that
folder. This hast to be done with Gimp closed. Now that you have your texture in place. Close Program Files, My computer and go to Gimp.
For my texture I chose my own thing, a polka dot pattern photographed from a fabric. You can do that too. You can buy swatches (they call them Fat Quarters) used for quilting, and you can use them as backgrounds.
Go to Gimp, open your PNG image in Gimp.
Once the image opens, click on the Ellipse Selection tool and draw a selection. The Position should be 158 x 158, the Size: 449 x 444, Fixed Aspect Ration should be selected, also Antialiasing
should be selected.
Now, in the Toolbox, click ont he Foreground color, (it is usually Black) Change your Foreground color to Hex # 00f9f9, which is a light aqua. Leave your Background color white.
Go to Layer, New Layer. Choose the Bucket Fill tool and go to Pattern Fill and click it, scroll down to the pattern you want and Fill the selection with your image. Mine was pink and white so I clicked on it
with the Bucket Fill tool and made it that light aqua. If you need to do that, do it. It's okay if the color contrasts, also. Yellow would look lovely.
Now go to Select, Border, and make it a bit wide, and select feather border. Click OK. Then go to Select, None.
I went back to Paint.Net and Added a Drop Shadow. To be able to do that, you need to download the Effects package and install it as you did for your Gimp textures, in Paint.Net's Effects folder.
Then you will find it under Effects, Object, Drop Shadow. To finish, go to Effects, Blur, Gaussian Blur and choose only 2. C
lick Ok. Save and your done!
Warning: Color bleeds a little bit from the stripes, but this is only to show you how you can make up for any clumsiness in mouse drawing by going back and forth between software programs.
Inter-connecting software packages to get the most out of them as you learn to use them is fun. Try to see what you can come up with!
........................Do You Feel Mistreated?


