My Blog List

Showing posts with label gimp tutorials. Show all posts

How to Make an Easy ribbon in Gimp


Fire up Gimp.
Create a new image size 1000 x 1000, choose Advanced Options, Transparency.
Now choose the Rectangle tool and create a selection that has the following settings:
Position 9 x 316
Size: 998 x 208

Click on the Foreground color and change it to #f69e64. Click Ok.
Select the Bucket tool and fill your selection with the color.
Go to Layer, New Layer.
Go to Select, Shrink and shrink your selection by 4 pixels.
With your FG color set to #f69e64 and your BG color set to White, click on the Blend tool, click on the little arrows so that the White color will be the first color in the gradient,
and choose FG to RG (RGB) Gradient, stroke with your mouse straight down to make your gradient.
In the Toolbox, right click on the top layer and then choose merge layers.
Go to Select, Shrink and shrink by 1 pixel.
Then got o Select, Invert.
Go to ScriptFu, Layer Effects, Satin. And choose the following settings:
Opacity: 75.0
Blanding Mode: Soft Light
Clor: Black
Offeset Distance: 11.0
Size: 14
Contour: Linear
Check :Invert
And check Merge with Layer, then click Ok.

Save as Png image
Done!

................
Moving Mountains. . .

Good Looking Beginner's Glitter Button in Gimp


Open up Gimp.
Make a new image 300 x 300 px.
Choose the Ellipse tool and make a selection.
Position: 38 x 37
Size: 224 x 225
Change the Foreground color to #4f4f4f and leave the Background color as White. Now, selecting the Blend or gradient tool, fill in the selection with a Linear gradient by stroking downward
with your mouse, going from dark to light.
Go to Layer, New layer, named it "glitter1".
Go to Filters, Noise, RGB Noise. Uncheck Independent RGB, and select Correlated Noie. Move all the levers all the way up to 1.00, and click OK.
Go to Layer, New Layer, name it "glitter 2."
Go to Select, Shrink and shrink the selection by 25 px.
Go to the gradient tool again and choose Golden.
Fill the new selection with another Linear gradient.
Go to Filters, Noise, RGB Noise. Move all the levers to 0.60, click OK.
Now go to Layer, new Layer, name it "center". Go to Select, Shrink and shrink it by 20 px.
Change the Foreground color to ##fb0000 and the Background color to #340204
Go to the Gradient menu and select Adaptive Supersampling, and also RG to BG (RGB) gradient and fill int he selection with the new
gradient.
Change the Foreground color to White, go to Brush, and select the Circle Fuzzy 19 brush, and click on the upper right side of the center once to give it a nice shine.
Go to Script-Fu, Bevel and Emboss, and choose Inner Bevel, depth: 15, direction Up, sie: 10 and leave the rest as is. Click OK.
Go to Layer, new layer, then to Script-fu Drop Shadow.
Then go to Layer, Merge down, then go to Select, None.

Save your Button as a PNG image.
.................

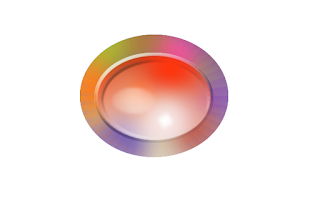
Shimmering Stone in Gimp


Fire up Gimp.
Create an image 400 x 600
Choose the Ellipse selection and draw a selection.
Position: 150 x 65
Size: 278 x 230
Change Foreground color to #444444, click OK. Select Bucket tool and fill selection with this color. Make sure the Background is White.
Click on the Blend or Gradient tool and, choosing a Linear Gradient, with an Opacity of 100%, and clicking on Adaptive Supersampling so
that your gradient will be really smooth, make sure your gradient goes from dark to light and stroke with the mouse downward to fill the
selection with the gradient.
Change the Foreground color to #fc00fc
Choose the Brush tool, and select Circle Fuzzy (19)
And click on the selection once.
Change the Foreground to #e7d7d6 and click on the selection once.
Change the Foreground to #fca424 and click on the selection once.
Change the Foreground to #24df47 and click on the selection once.
Change the Foreground to #1c0fff and click on the selection once.
Change the Foreground to #ff370f and click on the selection once.
Change the Foreground to #ce0c1f and click on the selection once.
The place where you make those clicks is up to your taste, but leave some of the gray visible.
Go to Filters, Map, Illusion. When the little menu opens, choose Mode 1, Divisons: 12 anc click Ok.
Go to Layer, New Layer. Create a new Ellipse selection with a Position of 183 x 105 and a Size of 212 x 158.
Change Foregound color to #ff370f and choosing the Gradient tool, and making sure your Background color is White and
that the direction of your Gradient goes from dark to light, stroke with your mouse to create a Linear gradient to fill the new
selection.
Go to Scriop-Fu, choose Inner Shadow, and when the menu opens, make sure the color is Black, raise the Opacity to 80.0
Size: 10 Blending Mode: Half Round
Source: Edge
Offset Distance: 5.0
And leave the rest as is.
Go to Script-Fu: Bevel and Emboss
Style: Outer bevel
Direction: Up
Highlight Color: White
Shadow Color: Black
Highlight Opacity: 75.0
Shadow Opacity: 75.0
Surface Contour: Half Round
Got o Layer, New Layer.
Choose #ff370f as your Foreground color again and the Brush tool and select Circle Fuzzy (19) and click once on the upper
right corner of the inside of the current center ellipse.
Change the Foreground color to #f9e8e7 and click in the selection once at the lower right portion of it.
Make another small ellipse selection towards the left of the selection, fill with #ffffff.
Go to Filters, Blur, Gaussian Blur, raise it up to 60.0 and click Ok. Repeat.
Go to Script-Fu
Outer Glow
Select size: 10
Color #ffffbe
Contour: Ring
Opacity: 75.0
Click Ok

Go to Filters, Light and Shadow, Sparkle. When the little menu opens, choose the following settings:
Luminosity threshold: 0.001
Flare intensity: 0.55
Spike length: 20
Spike points: 5
Spike density: 1
Select Preserve luminosity
Natural color
Leave the rest as is. Click OK
With the Ellipse tool, make a selection on top of the little flare and then go to Blur, Gaussian Blur, and blur it to
15 px.
Go to Filters, Blur, Gaussian Blur, and blut to 5.0. Repeat.
Go to Save As, and Choose Advanced Selection and Save as a PNG.


.................
Bible Universe

Make an Embossed Beginners Button or Scrapbooking Brad in Gimp


If you have not yet installed Gimp, please do, it is FREE.
Once installation is completed, open Gimp.
Create a New Image 700 x 700 in size, 72 ppi. Click on Advanced Options, and choose Fill with Transparency. Click OK.
With the Ellipse selection make a circle, and choose the following settings:
Position: 166 x 12
Size: 373 x 373
Go to the Toolbox and change your Foreground color to 99686B (a gray) and leave your Background as White.
Click on the Gradient tool, choose Linear, 100% Opacity, also click on Dithering and Adaptive Supersampling.
Stroke with your mouse from top to bottom to make the gradient, making sure the top is darker than the bottom.
Go to Layer, New Layer. Go to Select, Shrink and Shrink the new selection by 15 pixels, click OK.
Change the Foreground color to 1E1B12 and the Background color to CEBCBC. Select the Gradient tool again and leaving everything as before,
make another gradient.
Go to Script-Fu, Layer Effects, Inner Glow. When the little menu opens, select opacity 75.0
Contour: Linear, Size: 10.0 and leave the rest as is. Click OK.
Go to Layer, New Layer. Then to Select, Shrink and shrink by 20 pxls.
Change the Foreground color to 8F0401, and the Background color to f20000 and make another gradient.
Go to Layer, New Layer and shrink it also by 20. Change color to f20000. Change Gradient to Foreground to Transparent and make the new
gradient fill. Go to Script-Fu, Layer Effects, Bevel and Emboss and choose Pillow Emboss and click OK.
Make a new layer, shrink selection by 10 px, change gradient to FG to BG (RGB)and fill new selection.
Go to Layer, new Layer, then go to Script-Fu, Bevel and Emboss, and choose Inner Bevel. Click Ok.
Change the Foregorund color to ffffff. Go to Brush, and choose Circule Fuzzy 19, move the scale lever to 10.0, Opacity 50.5 and click twice at the bottom
of the button.
Go to Filters, Blur Gaussian Blur and choose 10.0 px, and click OK.

Save your button as a PNG by choosing Save As, then Select File (By Extension and scrolling down to the PNG format.)


Done!

Experiment with your own color choices and have fun!


.............
Bible Universe

Amber and Gold Button or Brad


This one is really easy to make and pretty too! You will be working only on Gimp, so if you have not installed the software, begin by installing it, it's free.
Open Gimp
Create a new File, size 640 x 480 or any size you like.
Go to the Toolbox and click on the round Ellipse Selection tool and draw a circle.
Click on the Gradient or Blend Tool. Scroll on the Blend Menu options and select Brown Gloss for your Gradient.
Choose Linear, Dithering, and 100% Opacity. Make your gradient fill with the stroke of your mouse downward.
Go to Layer, New Layer. Go to Select, Shrink, and when the menu opens, shrink the new selection by 10 pxls.
Return to the Gradient or Blend menu and choose a new Gradient: Gold. Stroke with the Mouse to fill in the new selection
with the gradient.
Go to Script-Fi, Color Overlay. When the menu opens, click on Color and choose the following Hex number: ff3131; Blending Mode: Soft Light, click OK. Let it render.
Return to Script-Fu, Layer Effects, and choose Bevel and Emboss. When the menu opens, make the following selections:
Style: Pillow Emboss. Direction: Up. Size: 10. Gloss Contour: Linear. Leave rest as is. Click OK.
Go to Filters, Light and Shadow, Drop Shadow, Offset X: 8, Offset Y: 8, Blur Radius: 15, Opacity: 80, leave rest as is.
Go to the Toolbox, and change your Foreground color to White. Click on the Brush tool and choose the brush Circle Fuzzy (19), and leave all other settings as is.
Click on the lower side of the button to make a glow spot. Go to Script-Fu, Layer Effects, Inner Glow.
Go to Filters, Light and Shadow, Drop Shadow.
Go to Filters, Blur, Gaussian Blur and only blur to 2 pxls.

Save as, Select file by Extension, and save as a PNG image.

Done!


.............
Who Do You Think You Are?
(You are more special than you think!)

Easy Pink Brad or Button in Gimp


This is a pretty nice button or scrapbooking brad for a beginner. It looks really well, which will encourage you to experiment more with the wonderful software.

Open up Gimp.
Create a new image 269 x 272 pixels, background color Transparency, Resolution 96.00. For your Foreground color, choose # A22828, for your Background color, choose # FF8770.

Click on the ellipse or round select tool and from the top corner of the canvas, drag a selection down to cover almost the entire canvas.Click on the blend or gradient tool and make sure
the arrows of the gradient are such that will give you a gradient that is darker at the top than at the bottom. Gradient Shape should be Linear, Opacity should be 100%, click on Dithering and also on Adaptive Supersampling, to make the gradient smoother. Pull the mouse on a straight line across your selection to fill it with the
gradient. Go to Select Shrink. Shrink it to 15 pixels. Click OK. Now go to Script-Fu, Inner Shadow and choose the following settings: Opacity 26.0, Contour: Linear; Blending Mode: Normal.
Source: Edge. Choke: 0.0; Size 5.0; Offset Angle: -90.0;Offset Distance: 2.0. Click OK. Create a new layer and name it Center. Shrink it as before but this time by 10 pixels. Click on the arrows of the
gradient tool so that the colors will run in opposite direction as before and fill the new selection, lighter on top and darker at the bottom.
Go to Script-Fu, Inner Glow, then choose the following settings: Opacity 54.0 and leave the rest as is. Click Ok.
That's it! Simple, isn't it?
Practice and add whatever changes you like best.

Here's a sample page using this brad or button to give you ideas:


...................
Bible Universe

How to Make a Nice Swirly Paper in Gimp


Fire up Gimp. Go to New and select the size of paper you want. I will choose 640 x 480 for the sake of making the image
easy to load. Make the image a little larger than you want it, if your memory allows you to, because we will have to trim the edges later on.
Go to your bucket tool, and click on the Foreground color. Write down the following color in your HTML notation: 383838 and click Ok.
Now click once on your image layer to fill it with the color. Now go to Filters, Noise, HSV Noise. When the menu opens, move the Holdness lever all the way up to 8.
Move the Hue to 0, move the Saturation to 0, and the Value all the way up to 255 (the maximum). Click Ok.
Now go to Colors, then Colorize. Move the Hue lever to -118, Saturation 31, leave the rest as is, and click OK.
Now go to Filters, Blur, Motion Blur. When the menu opens, make sure your Blur Type is Linear, Length: 110, Angle: 0. Click Ok.
Select the crop tool or choose Ctrl plus c, select the part of the image you would like to keep, avoiding the edges that don't look too good. Once that is selected, click
once on the center of the image to crop it.
Now go to Filters, Distors, IWarp. Click on Move. Set your Deform Radius to 40, and your Deform amount to 0.30. Make sure Bilinear is selected. Then click on the preview
image randomly in different spots, pulling the mouse as you go to distort the direction of the color in the page. Now choose Swirl CW and click twice and then click on Swirl CCW, and click once, all randomly.
You can also choose Grow and Shrink, move the color around according to your taste and then click Ok. Save as a PNG.

.............
Who Do You Think You Are?
(You are more special than you think!)