My Blog List

Showing posts with label how to make your own scrapbooking paper in gimp. Show all posts

How to Make an Easy Striped Paper in Gimp


Open Gimp. Create a new image and select the size of paper that you want. I will choose 640 x 480 for the same of making my image load up quicker.
Now click on the Foreground Color and change it from Black to #77a5c2, which is a nice blue color. Click Ok and close. Select the bucket tool
and fill your image with Blue #77a5c2, for the stripes we will choose color #e7e7e7. So now that you have filled your background, change the color to #e7e7e7 Click OK and close.
Now,to make the stripes, choose the pencil tool,and the pencil size Circle (11), press the shift key
and click on the spot where you want to start drawing your first line (click right outside of the canvas for neatness and just make sure you pull your mouse down in a straight line while holding down
the shift key, then, as you let go of the line, make a small click to finish it and the line will appear in the color you want, then you stop pressing on shift and your first line is made.)
Note: If you let go of the shift key before the line is completed your line will not be straight.
Now change the pencil size to Circle 13 and repeat another line a little further on. Go to the toolbox and change your pencil size again to Circle 17 to make a broader line. Make sure that your Foreground color is
still #e7e7e7. Make a line with the new pencil stroke. Change your pencil size to Circle 19 and make another line, as before, press the shift key on the keyboard and hold it while you move your mouse
downward to make your line, watching that the line is not wavy, then you release the mouse and the shift key when you are finished making your line.
Change pencil size to Circle O7 and draw another line. Now change the pencil size to Circle 09 and make another line. Then change again to Circle 19 and make 2 consecutive lines. Then, change to Circle 11 and make 1
line. Change to Circle 07 and make a line. Now change to Circle 13 and make 1 line. Change to Circle 15 and make 1 line. Change to Circle 07 and make 1 line. Change to Circle O5 and make 1 line. Change to Circle 19
and make 2 consecutive lines, change to circle 11 and make the last line. Save as a PNG.

Now you can tweak this image a little further to make it different.
All you have to do is to download any of the pretty free brushes for Gimp (there are hundreds of them online!) I will be using two to show you what you can do.

For the first one, let's the change the Foreground color to a darker Blue than the background of the the striped paper. This blue is color #0a55b3. Click OK.
Now go to your toolbox and click ont he brush tool, and, having already installed your brushes (you install them into your computer on the Desktop, open them up and then go to Computer, Program Files, Gimp, and click on the different files
according to your version of Gimp until you find the folder called Brushes, then you simply copy and paste each brush you want into that folder BEFORE you open Gimp, then open Gimp and your brushes will all be ready for you), assuming you
have a brush named glitter_10, you move the Scale lever down to 0.15 and then you just click all over the striped paper randomly. Now your paper looks different. Save as a PNG file.
If you use the brush named doodles2_brushes_by_hawksmont32, you will get doodled stars, which you will apply randomly to your paper. And so forth.
If you want a smoother look, go to Filters, Blur. Save as a PNG. Experiment until you get a hang of making a series of different papers out of your original work.

By adding embellishments of your own choosing you can make a lot of nice pages with this basic paper. here is an example with my main blog's tag line:


.............
Who Do You Think You Are?
(You are more special than you think!)

How to Make a Nice Swirly Paper in Gimp


Fire up Gimp. Go to New and select the size of paper you want. I will choose 640 x 480 for the sake of making the image
easy to load. Make the image a little larger than you want it, if your memory allows you to, because we will have to trim the edges later on.
Go to your bucket tool, and click on the Foreground color. Write down the following color in your HTML notation: 383838 and click Ok.
Now click once on your image layer to fill it with the color. Now go to Filters, Noise, HSV Noise. When the menu opens, move the Holdness lever all the way up to 8.
Move the Hue to 0, move the Saturation to 0, and the Value all the way up to 255 (the maximum). Click Ok.
Now go to Colors, then Colorize. Move the Hue lever to -118, Saturation 31, leave the rest as is, and click OK.
Now go to Filters, Blur, Motion Blur. When the menu opens, make sure your Blur Type is Linear, Length: 110, Angle: 0. Click Ok.
Select the crop tool or choose Ctrl plus c, select the part of the image you would like to keep, avoiding the edges that don't look too good. Once that is selected, click
once on the center of the image to crop it.
Now go to Filters, Distors, IWarp. Click on Move. Set your Deform Radius to 40, and your Deform amount to 0.30. Make sure Bilinear is selected. Then click on the preview
image randomly in different spots, pulling the mouse as you go to distort the direction of the color in the page. Now choose Swirl CW and click twice and then click on Swirl CCW, and click once, all randomly.
You can also choose Grow and Shrink, move the color around according to your taste and then click Ok. Save as a PNG.

.............
Who Do You Think You Are?
(You are more special than you think!)

Chocolate Brown Wooden Paper in Gimp


Fire up Gimp. Go to New and select the size you want for your image. I will choose 640 x 480 for the sake of making the image
easy to load.
Choose the bucket tool and choose the following brown color for the base of your wood texture: 834C24. Now fill your image with the color.
Now go to Filters, Noise HSV Noise. When the menu opens, choose as follows: Holdness: 4, Saturation: 3, Value: 17. Click OK.
Duplicate the layer, bring the opacitiy down to 20.0 Now go to Filters, Blur, Motion Blur. When the menu opens, choose Linear, Length: 300,
Angle 90, click Ok. Now to to Filters, Enhance, Sharpen. Whent he menu opens, move the Sharpness lever up to 90. Click OK.
Now to Filters, Blur, Motion Blur. Choose Linear. Length 256. Angle 90. Click Ok. Let it render.
You now have a soft wood grain against a warm and nice brown. The color is a bit dark and chocolately. If you want it a bit lighter, go to Colors,
Hue and Saturation and move the Hue lever until you get the shade of brown that you like the most.
I share here a page scrapped with this paper.

Softly Striped Green Paper in Gimp


Fire up Gimp. Go to New and select the size you want for your image. I will choose 640 x 480 for the sake of making the image
easy to load.
Now go to Filters, Render, Clouds, Difference Clouds. When the menu opens, leave the settings as they are and click OK.
Now go to Filters, Blur, Pixelate. Wait till it renders.
Now to Filters, Blur, Motion Blur. When the menu opens, choose an angle of 90 degrees and a length of 999. Click OK. Let it render.
You will begin to see stripes.
Go to Color, Colorize. When the menu opnes, move the Hue lever to 148. Click ok. Now you have a nice green.
Create a new layer. Choose the Rectangle, Select tool, then Select the picture, in the Select Tool menu, choose Feather edges, and set the feathering to 30.
Then go to Select, Invert. Choose Black as the Foreground Color and then go to Edit, Fill with FG Color (Black).
Create a new layer. Go to the Gradient Tool. Keep the Linear Gradient chosen. Choose Opacity 60.0, And set the Gradient FG to Transparent. Select Dithering. And now, draw the gradient
by pulling with the mouse from the top to the bottom of your paper.
Now to go Select, None. Then to Layers, Merge Down Layers.

Now you save it as a PNG, because it has the best quality, and you are set to use it however way you want it!
.............................

Determining the Will of God

How to Make Scrapbooking Papers in Gimp---Part 2


There are many, many filters and brushes for Gimp online. Most of them are free. You can Google to find them and install them in your computer.
They will allow you to make quite a bit of nice things with this software!


For another paper, click File New, and choose any size of paper you want. For the sake of expediency in photos, I will continue to choose 640 x 480.
Go to the Toolbox and click on the Foreground color, we will be choosing a lovely shade of pink, #EE3A8C. Now, click on the bucket fill tool and
fiull your paper with this pink color. Now go to Filters, Artistic, Clothify. When the menu opens, choose Blur X: 10, Blur Y: 10, leave the rest as is.
Click Ok. Now you have a textured paper! Save as a PNG file (to do this, choose Save As, then Select File Type by Extension and scroll down to PNG) and use as you want!


Here are some examples of scrapped pages that incorporate the paper made above into the design.


Your creativity is your only limitation! Enjoy!


.................
God Loves You!

How to Make Your Own Scrapbooking Papers in Gimp---Part 1


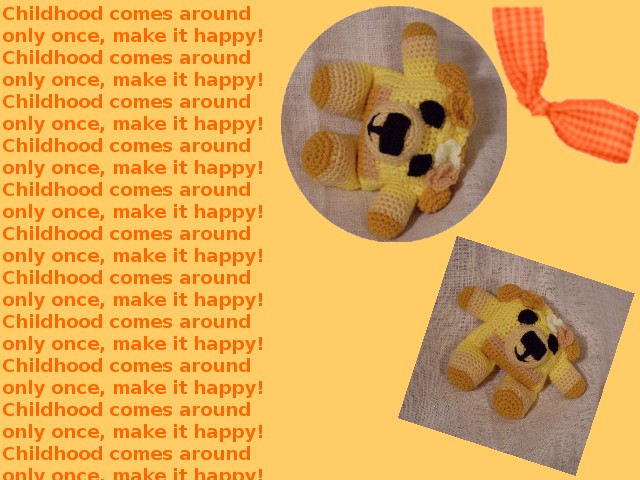
Fire up Gimp. Go to New and choose the size of paper you want. Because this is only a photo illustration,
I personally chose 640 x 480. Click ok.
Now go to the Toolbox and click Foreground color, choose #FFCC66, click ok. Select the Bucket Fill Tool, and fill the
paper.
Go to Layers, create a New Layer, make sure Transparency is selected.
Go to the Foreground color again and choose #FF6600. Select the Text Tool choose Sans Bold as a font (or any font you like best)
Click on the paper area and when the text dialog box opens, begin to write the following text: Childhood comes around only once, make it happy!
(I wanted to leave the rest of the paper free so I divided the text but you can write whatever you want and you can do as your taste indicates.)
Go to Layers, choose Merge Down Layer. Then Save the image as a PNG file with the name you want.

Here is an example of how I used this paper:


.............

God Loves You!