I was thinking of sharing a different tutorial but found this wonderful ice text tutorial that I think you might want to learn. Being winter, icy text would look terrific in any scrapbooking page!
Here is it. Enjoy!
................
Broken Toys
Learning to use open source and other free graphic softwares available to apply them to digital scrapbooking.
My Blog List
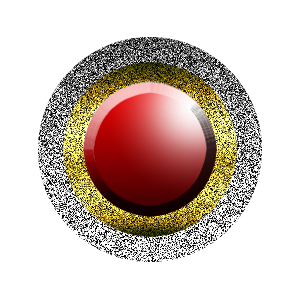
Good Looking Beginner's Glitter Button in Gimp

Open up Gimp.
Make a new image 300 x 300 px.
Choose the Ellipse tool and make a selection.
Position: 38 x 37
Size: 224 x 225
Change the Foreground color to #4f4f4f and leave the Background color as White. Now, selecting the Blend or gradient tool, fill in the selection with a Linear gradient by stroking downward
with your mouse, going from dark to light.
Go to Layer, New layer, named it "glitter1".
Go to Filters, Noise, RGB Noise. Uncheck Independent RGB, and select Correlated Noie. Move all the levers all the way up to 1.00, and click OK.
Go to Layer, New Layer, name it "glitter 2."
Go to Select, Shrink and shrink the selection by 25 px.
Go to the gradient tool again and choose Golden.
Fill the new selection with another Linear gradient.
Go to Filters, Noise, RGB Noise. Move all the levers to 0.60, click OK.
Now go to Layer, new Layer, name it "center". Go to Select, Shrink and shrink it by 20 px.
Change the Foreground color to ##fb0000 and the Background color to #340204
Go to the Gradient menu and select Adaptive Supersampling, and also RG to BG (RGB) gradient and fill int he selection with the new
gradient.
Change the Foreground color to White, go to Brush, and select the Circle Fuz
 zy 19 brush, and click on the upper right side of the center once to give it a nice shine.
Go to Script-Fu, Bevel and Emboss, and choose Inner Bevel, depth: 15, direction Up, sie: 10 and leave the rest as is. Click OK.
Go to Layer, new layer, then to Script-fu Drop Shadow.
Then go to Layer, Merge down, then go to Select, None.
Save your Button as a PNG image.
.................
Holiday Embellishment in Gimp

Make this nice looking Holiday embellishment in Gimp! The steps are pretty easy.
Open up Ginp. Make a new image, 640 x 480 in size.
Choose the Ellipse tool and make a selection that has the following Size: 242 x 231 (Don't worry about the position right now.) If you don't draw it
Choose the Gradient or blend tool, and choosing Golden gradient and stroking diagonally with your mouse, fill the selection.
Go to Layer, New Layer.
Then go to Select, Shrink, and when the menu opens, shrink by 20 px.
Now go back to the Blend or Gradient tool, click on the gradient symbol in the Toolbox and change it to FG to BG (RGB), now change the Foreground color to
#308014 and the Background color to #00C957.
Make a Linear gradient by stroking sideways diagonally from top to bottom of the selection.
Go to Script-fu and choose Bevel and Emboss, when the menu opens, change the style to Emboss, click ok to the regular settings.
Go to Layer, New Layer.
Go to Select, Shrink, and when the menu opens, shrink by 25 px.
Change your Foreground color to #ff0502 and Background color to Black.
Make another diagonal Gradient as before, with the new colors.
Go to Ecript-fu and choose Bevel and Emboss, when the menu opens, change the Style to Emboss and the depth to 10, click OK.
Go to Layer, New Layer
Select, Shrink,and shrink by 10 px.
Change your your Foreground color to Black and your Background color to White.
With the Bucket tool, fill the new selection with Black.
Now change your Foreground color to #ef9e11
Click on the Text tool and choosing the Arial Bold font and writing in and size 53, write the letter JOY, typing a space in between letters, right about
the middle of our selection.
Now go to Script-Fu, then Bevel and Emboss, change the Style to Inner Bevel. Adjust the following settings:
Depth: 10
Size: 10
Move the levers of the Highlight Opacity and of the Shadow Opacity to 100
and select Merge with Layer.
Click OK.
Change the Foreground color to # ff0502 and your Background color to Black. Click on the Gradient tool and choose FG to BG (RGB)
Select the Pencil tool, and in the Toolbox, choose the Brush Circle 19, for the Stroke size of the Pencil, and choose Use Color From Gradient.
Press the Shift Key while you draw your line.
Now click on the Rectangle tool, and draw a selection a little bit wider than your red line, 50 x 16 in size would be nice.
Fill it with the Golden gradient we used before.
Now go to Select, None.
Then to Layer, Merge Down.
then to File, Save As Select File Type (By Extension) and choose PNG.
That's all!
.................
Subscribe to:
Comments (Atom)