
We will make two different examples of a Post it note, which you can use to add little messages to your blog or website, even to your sales page!
Fire up Gimp.
Create a new image (640 x 400 will do), in Advanced Options, choose Background Transparency
Take the Rectangle Select tool and create a square selection (Position 125 x 26 and for size: 382 x 340 Fixed: Aspect Ratio)
Now, click on the buck
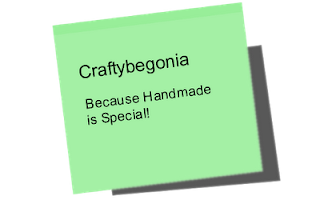
et tool to select it and then click on the Foreground color to change it. Most people make their Post It notes Yellow, I personally like them in colors, so I will use another color. I will use color #a4f0a5, which is a lovely Mint hue. Once you have chosen your
color, click on the bucket tool and fill your selection with that pretty Mint green. Make sure your opacity is 100% and the Mode is Normal.
Now go to Select, None.
Now click on the Rotate Tool in the Toolbox (the fifth from the left) and once you have selected it, click in the center of your Post It note,
and a little dialog box will appear. Now, where it says Angle, write simply -7 and click rotate.
Click on Shift + D to select the Dodge and Burn tool, choose the brush size Circle 19, Scale 100% and Exposure 50.0, click on Burn and Midtones in the Dodge and Burn dialog box in the
Toolbox. Click on Shift to make a straight line and holding shift down, make a line across the top of the Post it.
Using the Lasso tool and working as straight as you can, make a square selection that is a little bit inside the Post It and a little bit outside. Change your Foreground Color to #585858,
and, selecting the Bucket tool, choose an opacity of 100% and fill the selection with the color. Then go to Filters, Blur, Gaussian Blu5, and set the blur to 5.0
Then go to Select, None. Now choose your text tool and write whatever you want on your Post It note, rotating it a bit to fit the direction of your note, until you have just right, where it looks natural.
Create a new image (640 x 400 will do), in Advanced Options, choose Background Transparency
Take the Rectangle Select tool and create a square selection (Position 125 x 26 and for size: 382 x 340 Fixed: Aspect Ratio)
Now, click on the bucket tool to select it and then click on the Foreground color to change it to e8adcf and click on the bucket tool. Fill your selection with this pretty pink.
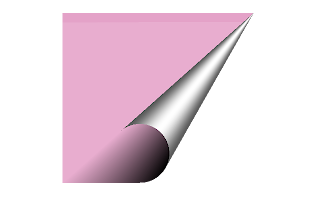
Click on Shift + D to select the Dodge and Burn tool, choose the brush size Circle 19, Scale 100% and Exposure 50.0, click on Burn and Midtones in the Dodge and Burn dialog box in the Toolbox. Click on Shift to make a straight line and holding shift down, make a line across the top of the Post it.
Now go to Filters, Distorts, Pagecurl. Filters, Blur.
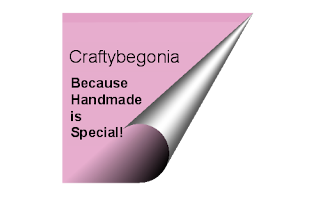
If you want to, you can write something in the little piece of paper that is left after the curl.
 ..................
God can Provide


