My Blog List

How to Make an Easy Ribbon In Paint.Net #2


Another easy ribbon for your digi scrapbooking which you can make while still a beginner with Paint.net to get your feet wet with this software and still come up with embellishment for your scrapbooking pages!

Choose File, New.
Select the Follwing Settings: Width 50, Height 600, Resolution 96, leave rest untouched.
Select the gradient rool from the tools meun. Pick two colors you like. Make it a linear grandient. Choose Linear reflected.
Pull the mouse down so that the colors will change from top to bottom. Go to Effects, Distort, Stitch, choose distance 25, With 2, leave rest untouched.
Save your ribbon and use as you like!

In God's Workshop


Paint.Net Another Terrific FREE Software How to Make a Ribbon- Part 1


Continuing with our tutorials to learn the basics of Pint.net, another free resource that you can use to make embellishments or enhance images for your digital scrapbooking.


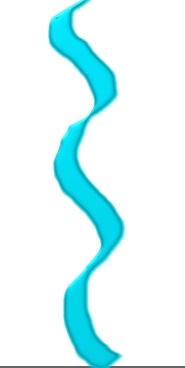
This ribbon was made with Paint.net, it is very easy to make and very good looking. Even a beginner out of the gate can make it. I explain how to do it below.


If, after watching the 2 previous tutorials, you are interested in downloading Paint.Net, go here:

http://www.paint.net/

There are a number of filter plugins that you must know about to be able to make the most of your Paint.net software. In the Paint.Net Forums you will be able to find the free plugins and download the packages. They are essential to be able to create textures and made other wonderful effects.

For the following tutorial you will need to have downloaded and installed
(to install the filters you simply click on them to open the list. Then go to computer, C Drive, Program Files, look for Paint.Net, open the folder for filters and then copy one at a time the filters in the list and paste them in the filters folder. Open Paint.Net when you are done and look for the filters, if you did it right, they will be right there! ) Get Pyrochild collection of Filters and also all the basic filters and effects.


Easy Ribbon in Paint.Net #1-

Choose File, New.
Select the Follwing Settings: Width 50, Height 600, Resolution 96, leave rest untouched.
Select the gradient rool from the tools menu. Pick two colors you like. Make it a linear grandient.
Pull the mouse down so that the colors will change from top to bottom.

Go to effects Distort Ripple

Choose Amount 2.0, Ripples 10.53 Ripple Phase 0.00 Highlight 10 Edge behaviour Clamp to Edge Quality 4.00 Than click to apply the effect.
This will give your ribbon a soft linear texture, as if it was made of grossgrain but woven diagonally. Play with the amounts if you want this effect to be more noticeable.


You're done!


Do you know someone who's unemployed? Share these encouraging promises with them!
Bible Promises for the Unemployed1

Another FREE Software with Tremendous Possibilities!

Paint.Net is a terrific open source software (which means it is free) with tremendous possibilities for any creative person, including digi scrapbookers! you can downlead it easily at its own site.

The Very Basics of Paint.Net Tutorial 1


The Very Basics of Paint.Net Tutorial 2

Easy Inskcape Ribbon:


There are different ways of making a ribbon in Inkscape, but for a beginner, I found an easy one that will give you satisfying results. you must tinker with it till you get it to work the way you want it to, to suit your particular taste and creativity.

The steps are pretty simple and you can learn them very quickly. To make this ribbon, choose the pen drawing tool. Choose a color you like, I decided to pick a pretty aqua in the basic palette.
At the top of the page, choose the following settings: Width: 38; Thinning: 100; Angle: 30; Fixation: 90; Caps:0.00

Then draw a ribbon. With Selecting tool, select your ribbon. Then go to Filters, Blus, Cross-Smooth. Then Filters, Color, Fluorescence.
Then Go to Filters, Materials, Metallized Paint. That's it, you've got a very easy ribbon for any digi scrapbooking project you might have.

FREE online, the beautiful book on the life of Christ, The Desire of Ages see the comforting love of God like never before in these tough times!

Inskcape tutorial: Basic


If you would still like to practice more with the potential that this free software has for your digi scrapbooking projects but don't want to jump into the deep waters of a very invloved and difficult tutorial, here is a basic one for beginners to get your feet wet in this vector software's potential.

By the way, the star in my illustration was a made with the star polygon tool (choose the number of points or spokes you want for yours), I colored it
a bright medium pink. Then I selected it and went Filters, Shadows and Glows, then Glow.
Then, to give it an interesting texture, go to Filters, Materials, Enamel Jewelry and then you just save it.

Enjoy!

Inkscape Basic tutorial for Beginners


..................

FREE online, the beautiful book on the life of Christ, The Desire of Ages see the comforting love of God like never before in these tough times!

How to Make Your Own clipart with Inkscape!

When you start using this powerful open source software one of the things you will eventually wnat to learn how to do is to make your own clipart for scrapbooking themes and special digi scraps. This informative video tutorial will get you started in that direction!


.................

Need encouragement? Visit this beautiful blog!

Better Than Rubies. . .

How to Use Inkscape Filters

Inkscape comes with many filters and there are many other plugins that you can get to add power and versatility to your software. This video tutorial will show you how to use some of those filters in a creative way.


..................

The Wonderful Love of God

Another Simple Flower Embellishment for a Beginner

When you are starting to use a software that has as much potential as inkscape, you feel elated when you can create something, let alone a nice looking embellishment! So, to keep your creative juices flowing, here is a very simple to make embellishment you can try on your own and transform into many other pretty flowers! Open Inkscape. Select Star. Make sure the following are selected at the top of the page: Corners (that will determine how many petals your flower will have), for this tutorial we will select 8. Spoke ratio: 0.500 Rounded: 0.000 Randomized:0.000 Choose the color Yellow. Now, go Path, and Choose Dynamic Offset. A little node will appear on one of the star's spokes. Pull on that node to make the star fatter and more into the shape of a flower. Now go to Path, then object to Path. Now go to circles, ellipses, and draw a circle while you hold the Ctrl button down. Give it a red color (it will look orangey over the yellow flower.) Drag it to the center of your flower. Go to Object, then choose Align and Distribute, and look for the position that will align your circles vertically and horizontally in the center of the flower. Click and close the dialog box. Make a second, smaller circle while dragging the Ctrl key down so that it willnot be an oval. Make a little draker than the first one. Click on the slect arrow and drag it to the center of the flower. Go to Object, then choose Align and Distribute and look again for the position that will align your circle vertically and horizontally in the center of the flower. Close the dialog box. Click on the smaller circle at the center of the flower and choose Filters, Ridges, Metallized Ridge. Now with the ink pen tool make a swirly line in red. Copy it. Now click on it to select it, and click again to move it and to position it on the first petal of the flower. Now click outside the flower and paste, to produce the worly line again, click twice on it to bring up the rotating handles and turn it to the position it should go for the second petal of the flower. Choose the select tool and move it to where it goes, repeat this process for every petal. Now choose the first line, and with it selected, go to Filters, Shadows and Glows, then Cutout Glow, repeat with all the lines. Now Select the whole flower. Go to Path, then Union. Then save. 

A Simple Flower Embellishment

Sometimes, simple is the best. We are now going to make a very simple flower that you can use in a grouping in any digi scrap project you're making. Open Inkscape. Choose triangle (make sure triangle is also chosen at the top of the page). For first flower, choose 7 corners, spoke ratio: 0.0500. Rounded 0.000. Randomized: 0.000 Now, go Path, and Choose Dynamic Offset. A little node will appear on one of the star's spokes. Pull on that node to make the star fatter and more into the shape of a flower. Color, a dark pink. Choose the drawing tool and with the stroke in black and the color in dark pink, thick make lines. Once you have them all around the spokes. If you need to, click twice on the lines to bring up the rotation arrows and position the lines in a more natural direction. Now go to circles, ellipses, and while holding the Ctrl key down, draw a circle. Make the color orange. Drag it to the center of the flower. Make another circle, make this one smaller and a medium yellow. Position it in the center of the flower. Now go to the spirals tool and draw a spiral on top of the smaller circle, now go to Filters, Scatter and Air Spray. Then go to Path, and select Union, to unite the pieces into one single flower. Then save. ............ 
When you do digital scrapbooking, if you like to embellish your pages genereously, you will never have too many elemnts to use! Flowers are one of the most useful when you want your pages to have that dainty, lovely, faminine look of bygone years or when you just want to add a pretty look to a page that just needs "something". Learning to make your own flowers is pretty useful, expecially if it costs you nothing.
This tutorial will show you how to make your own basic flower using inkscape. It is very easy and simple!


............
Alone in the Crowd
One of the things we use most in scrapbooking, is embellishments. Inkscape is a software that can unlock your creativity and allow you to create your own clip art and embellishments for your digi pages. In the following video you will learn how to make swirls and flourishes that you could use to decorate your pages.


...............
Read FREE online:
Alone in the Crowd

How to Creat a Pretty Heart with Inkscape

This is a really terrific, well-explained video tutorial on how to create a shiny heart on Inkscape. This heart is superb for many uses including scrapbooking.
Here is the free tutorial:


......................
In God's Workshop

Wonderful FREE Software for Scrapbooking Images: Inkscape


Inkscape is a vector graphics editor that is distributed freely under a free software license. It is quite powerful and if you learn it well, you can make amazing images in it to enhance your digital scrapbooking. Since Inkscape is an open source software with capabilities similar to those of Illustrator and Corel Draw, you can create an endless amount of images with it, and because it is open source, it will always be free!

You can download it for FREE from this safe site:

Inkscape Draw Freely


We will be learning some nifty things using this software so, why don't you download it now?


..........................

Heaven, Is It For Real?