My Blog List

Make a Scrapbooking Christmas Tree


Fire up Inskcape.
From the bottom of the page, choose the Palette Tango Icons.
Click on the Stars and Polygons tool. A tool bar will appear at the top of the page. Choose 3 Corners, and a Spoke ratio of 0.500, leave the rest as is.
While holding down the shift key, draw a triangle and click on the darkest green of the Tango Icons Pelette to fill the triangle.
Now, click on the Create rectangles and Squares tool and make a vertical rectangle, fill it with the darkest hue of the orange colors (something of a rust), for now, put the rectangle to the side.
Click on the first triangle and duplicate it, place the second triangle on the side. Repeat that twice more, for a total of 4 triangles.
Drag the little square and place it under the first triangle. Click on the triangle to select it, then click again to show the rotating handles, rotate the triangle a little bit to the side as seen in the photos. Now drag another triangle under the previous triangle and click twice on it to reveal the rotating handles and rotate it a little in the opposite direction to the previous triangle. Repeat these two steps again. Now you have the “tree” shape. For the trunk, drag the little rectangle you already made to be covered by the edge of the triangle. To push it to the back, behind the edge of the triangle, click on the 9th tool at the top of the page to lower selection one step.

Now you have your tree. Let’s decorate it. Choose the Stars and Polygons tool again and make a star. Double click on it to rotate it to make it fit the top of the first triangle. Make it any color you like. Now, using the Ellipse tool, draw a small circle, with the circle selected, right-click on the stroke tool at the bottom of the page, below the palette, and by clicking the X button, turn off the stroke. Duplicate the circle and set the copy aside. Now, change the color to whatever you like and continue duplicating the circle and changing the color to make the ornaments to your liking. Now drag your ornaments to the tree and place them on the tree according to your taste. Now stroke with the mouse all over your work to select it all, go to object, Group, to join everything. Export as a Bitmap and save it to any folder you want your work in.

Done!

Bible Universe

Make A Decorative Scrapbooking Ribbon Using Inkscape


Open Inkscape.
♦ Go to View, Grid.The grid will help you calculate things.
Click on the Rectangle tool and make a rectangle as long as you would like your ribbon to be and of a thickness that will cover 4 lines of grid squares.
♦Now, make a small circle using the ellipse tool. Change the color of your ribbon to whatever you want it to be and make the circle the same color. Make sure neither one has a stroke
by right-clicking the stroke at the bottom of the page and then choosing Edit Stroke and clicking on the X in the Fill and Stroke menu.
♦Now you will see how handy the grid is! Select the little circle you just made and copy it. Now, Go to Edit, paste and when the new circle appears, click on it and drag it to the edge of the ribbon you made.
Copy and paste again and, skipping 2 little squares of the grid, position your second circle, repeat along the line until you have formed a scallop edge.
♦Stroke with your mouse to select all your work and go to Object, Group. Now you can move around your ribbon and it won't fall apart. Now go to View and click on Grid again to deselect it.
Now you have your basic scallop, you can give it a gradient, you can give it a texture, you can do whatever you want with it to spice it up!


►One cute way in which you can spice it up is by choosing a color you like, then, before you start copying and pasting the little circles, click on the little circle to select it, make then, clicking on the 9th button at the top of the page, counting from the left, lower the object 1 step, so that the top of the circle will be beind the ribbon, then, withe the circle still selected,
right-click on the stroke at the bottom of the page, below the colors, when the first little menu appears, select the contrasting color you want for your stroke, right-click on stroke, then choose Edit stroke (with the circle still selected) click on stroke style and give your stroke a width of 10.000 and from the list of Dashes, choose one that suits your fancy, click on the little circle to make the dashes appear. Now add your scallops as before. they will have an edge of cute little dashes. Experiment all you want and have fun!


Bible Universe

How to Make Your Own Ric Rac in Gimp and Paint.Net


For a while, I have wanted to find a way to make my own ricrac for digital scrapbooking. None of the tutorials online (which are mainly for Photoshop,) worked, so providentially, I came upon a way of making my own ricrac.
If you want to use ricrac in your digital designs and have Gimp and Pint.Net installed on your computer, follow this simple tutorial and you can make your own.


First, fire up Gimp.
Open a new image (I chose 640 x 400 for my size because it is easy to open.) Choose a transparent background, so that your ricrac will be ready to use anywhere.
Now Choose a color you like. Click on the Paintbrush tool, and select the brush size Circle 19.
Click at the center top or your canvas and holding the shift button stroke downward with your mouse to crease a straight line. The release the shift key and mouse button to complete your line.
Now go to Filters, Distorts, Ripple.
Choose the following settings:
Options: Antialiasing
Orientation: Horizontal
Edges: Wrap
Wave Type: Sine
Period" 20
Amplitude: 5
Phase shift: 0
And click OK. You got your ricrac!
Save As, then Select File Type by Exension and pick PNG.

If you would like to have a bit more fun with your ricrac and you have Paint.Net installed on your computer and have downloaded their marvellous free Effects packages, open Paint.Net.
Now go to File, and open your saved image. Go to Effects, Ripple and play around with the ripples until you are happy.


For example, for the following ripple, I left the Amount at 1.00, but I chose 6.18 for my Ripple, a RipplePhase of 0.00 and an Angle of -45.00, a Highlight of 10, Edge Behaviour: Reflect, Quality: 2, and clicked OK.
It will give you a bit distorted but different ricrac. You can also fill your ricrac with a texture, as you saw on the first ricrac example, I filled the ricrac with a gingham check I have as a texture in Gimp, I also did one with a polka dot. You can play around with what you like or with what you think would best suit your project.


Experiment and have fun!


Bible Universe

Making Scrapbooking Elements With Letters


You can make amazingly beautiful and quite easy elements to embellish your scrapbooking using letters. Here's a quick tutorial to make one.


This tutorial assumes you have Inkscape and Gimp installed on your computer.
It also assumes that you have at least an elementary understanding of both programs.

♦ Choose the Text tool and Using the font called Euphemia, size 144, write the letter X in caps.
Repeat it 5 times on the same line. Then, on another part of the canvas, write a single capital X.
♦ Copy and paste it twice more, then drag and position it under the other 5, skipping the first and last Xs.
♦ On the following row, make only 1 X in the middle. Now select all the Xs by stroking with your mouse over all of them to create a selection. Then go to Object, Group.
♦Now that they are all in a block, copy and paste 5 more of them. Select the ellipse tool and draw a medium-sized circle. Fill it iwth the color of your choice, I've chosen a pallet named Ubuntu and I'm using the Accent Red Base color, but you can pick anything you like. Fill your circle with the chosen color, also, color your Xs with it as well.
♦ Now, you must position your X blocks around that circle. Drag your circle and place it right under the first block of Xs, then, click on the next block you want to drag, and click again, you'll notice that arrows form all around it, these arrows will allow you to turn the piece around, so, guiding yourself by the finished image, turn the block of Xs around a little bit to fit the space on the side of the circle, drag and fit into that space, letting the ends of the Xs interlock.
♦ Repeat this process all around. You will have a piece that looks like this:


► Note- Make sure that where your Xs meet, they interlock smoothly, it will take a little bit of tweaking, but you can do it easily by moving the ends and adjusting until you're happy with the result. Not all the Xs will match all the time, but your goal is to at least make the outer edges match smoothly for a more
pleasing look.
♦ You can stop there, but I wanted something a bit more festive. Select all your element, copy it. Close Inkscake and open Gimp.
♦ Paste it in Gimp. Choose the Ellipse tool and make a circle inside the red circle you brought from Inkscape. Choose the Blend Tool and fill with a linear blend, (I picked Golden), then go to Select, Shrink, and shrink by 30 pixels. Go to Layer, New Layer.
♦ Change your Foreground color to f60d0d, and make sure your Background color is White. Now change the Blend to FG to BG (RGB) and stroke downward, also using a linear blend. Now click on Select None.
This is what your element will look like at this point:


♦ You can leave it like that, or you can apply one more little touch.
♦ Go to Filters, Light and Shadow, Supernova, and make sure to click with your mouse where you want the flare to go on the top of your circle. Choose a pale yellow for the color, which will be like a reflection of the gold, I used color e2ff59.
♦ Leave all the regular settings intact. Click OK to create your supernova.
♦ Once the effect has been completed, save the finished element as a png to incorporate it into any scrapbooking project of your choice. It will look like this:


These blocks of Xs can be used in a variety of ways to create flowers, crosses, and other elements also. Just play around with this and see how many of your own elements you can create! Have fun!


Bible Universe

Faux Cross Stitch Heart Element in Inkscape and Gimp


This tutorial assumes you have Inkscape and Gimp installed on your computer and that you have at least a basic understanding of the two.
You will also need 3 patterns of your choice installed in Gimp (there are tons of them that are free on the internet)
Fire up Inkscape.
Go to File, Document Properties, Grid, and click to make a Grid of your working space. Leave the little menu open for later.
Click on the Text tool, choose the font Acknowledgement. Size doesn't really matter because you can enlarge your creation later on.
pressing the shift key, make an X. Click on the Arrow tool and select your x. Got to Edit, Copy.
Now, we're going to form a heart, using the grid so that our "Xs" which are the symbols of our cross stitches, will be level.
Paste 2 X letters one next to the other, skip 3 grid squares and paste 2 X letters, one next to the other.
Now let's do the next row, beginning with the space in front of the first X of the first row, lay your Xs across, 7 of them, ending with the space after the last X of the first row.
Select all of the Xs of the previous row and copy, now paste on the row below. Now Click on one of the Xs of the first row and copy it.
Paste 5 Xs across the row below, skipping one X at the beginning and one at the end.
Make 3 Xs across the next row, skipping one X at the beginning and one at the end. Make 1 last X at the middle of the next row.
We have our heart shape now! Now with the mouse, select all of your Xs, go to Object, Group. Now click on the little menu you left open and remove the grid. Close the little menu.
Export your heart to a folder of your choice as a bitmap (PNG) and close Inkscape.
Fire up Gimp.
Open your heart in Gimp.
Select the Bicket tool, choose Pattern Fill and fill each individual X in the way that your personal taste tells you to. When you're happy with the results, go to Filters, Light and Shadow, Drop Shadow and apply it.
Then go to Layer, Merge Down. Save again by choosing Save As and choose File by Extension, so that you can make it a PNG.

That's all!

Here's a pretty inspirational scrapbook image using our heart:

Fun Letters Journaling Pad


You can make journaling pads using Inkscape and Gimp. They are a lot of fun and no two will turn out alike!
This tutorial assumes that you have Inkscape installed on your computer.
It also assumes that you have a basic knowledge of how to use the software.

Fire up Inkscape.
Choose a font you like. The best ones are the ones that are in cursive style.
Write as many letters as you want your journaling pad to have (the desired width)
Change the color if you like. Then select the row of letters and copy.
Now click on the 4th tool at the top of the page, right under the Layers menu, to rotate the copied letters.
With your mouse, drag them to meet the first set of letters, paste your copy again and do the same, inverting the direction, continue this until you have formed a square with letters.Join the corners closely to form a box.
Now, drag your mouse over them all, choose object, group.
If you want to, use the pencil tool and draw freehand lines for your journaling.
Export as a Bitmap.


Now open Gimp.
Because Inkscape makes all the Bitmap background transparent, we're going to have to "fill" out the center with color in Gimp. Open your file. Choose the rectangle tool and draw a square selection that reaches only just below, above and inside the sides of your pad, but does not reach all the way to the letters.
Fill with the color of your choice. you can also fill it with a paper texture if you like.
Save again as a PNG.
Experiment with different letters which you think would make fun journaling blocks.
Here is another idea.
Choose the font AR Julian and type 1 capital O, 1 lower case o, and repeat this for as long as you want for the width of your journaling pad. Then follow the steps as for the previous journaling pad.
You can also do this to make fun frames for your scrapbooking photos.
In Gimp, you can fill the os with textures using the Bucket fill tool, or if you have SVG photos, you can do that in Inskcape as well.
Here is how a journaling block made with this technique would look like.


And this is an embellished version of it.


That's all there is to it! Have fun making your own.


Bible Universe

Making Elements with Inkscape and Gimp Using Letters


Fun Oval Element Based on Letters

A digital scrapbooker never has too much elements to use (at least, that is my experience,) and learning to make new ones is always fun and comes in handy!

What you will need before you start:
Inkscape and Gimp installed on your computer
Two textures of your choice for Gimp (there are hundreds of free textures available)
Script-Fu installed and part of your Gimp (you can easily find it online)


  • Fire up Inkscape
  • Choose the text tool.
  • Pick the font Aharoni, size 144. Write the letter U (in caps)
  • Then go to Edit, Duplicate. Move the duplicated U to the top of the first one. Then, select the second U with the select tool or arrow, and, while the U is selected, from the top of the page, Click on the 7th tool from the left, to flip the U around. Now, drag it down to sit on top of the previous V. Click on the Select tool again, and drag your mouse over the two Us, now go to Object, Group. Now they are joined together. Click on one of the arrows and drag the Vs to make them larger.
  • When you have the size you want, go to File, Export Bitmap. Save it in the folder you want and close Inkscape.
  • Fire up Gimp.
  • Open your File from Inkscape. 
  • Change the Foreground color to a color that matches the patterns you will be using. Pick the bucket took. Click on the center of the joined letter Us, which are now an oval and fill the center hole with the chosen color. Select the Ellipse tool and draw an oval in the center of the colored spot.
  • If it does not come out of the size you want, click on it, arrows will appear and you can pull it into the shape and size you want. 
  • Go to Layer, New Layer and then choose the blend or gradient tool. Get the Golden gradient and choose a linear gradient, stroking with your mouse downward, fill the oval with the golden color. Go to Select, shrink and shrink the selection by 25 pixels, then go to Layer, New Layer.  Click on the bucket tool, change it to Pattern Fill and fill the oval is still selected, fill it with the first pattern of your choice. Then go to Select None.
  • Finally, choose the bucket fill again, and fill the rest of your element (the outside of the joined letter Us) with the second pattern.
  • Go to Filters, Blur.
  • You could stop right there and you would have a lovely element to use. But let us go a bit further.
  • Go to Script-fu, Bevel and Emboss. Choose for Style: Outer Bevel
  • For Depth: 5, Direction: Up, Shadow Color: Black. Leave the rest as is. Click OK.
  • It will raise the center oval, giving it an almost 3D look. If you want to add a little bit of gloss to it, click on brush. Change the brush to Cirlce Fuzzy (19),
  • change the color of the Foreground color to the color you want for the glow, move the scale size to 10.00 and click on the image where you want the glow to go.
  • I did my gloss in yellow because I have too much white in my patterns and because it looks like a sparkle in the gold, but you can try any color you want.
  • Save your image as a PNG and that's it!


Bible Universe

Creating Elements with Letters in Inkscape and Gimp


This is a super easy photo corner you can make in a jiffy and change in many ways to your heart's content.


  • Fire up Inkscape.
  • From the side toolbar, choose the text tool.
  • Select the Font Garamond, size 144, for the color, choose Black.
  • Click on the canvas and make the capital letter O.
  • Choose the Select or Arrow tool and select your O, drag one corner of the letter to make it even bigger. Now go to Edit, copy and paste 5 more copies of your original O.
  • Click on each O and drag it to position it overlapping the original O, right next to it but forming a chain, repeat with another O to form the bottom of your corner and then, drag the other two Os to overlap the top of the original, to form the rest of the corner chain.
  • Now, click on the Arrow tool again to choose it and drag a selection over all of your chain photo corner. You will see all of your Os selected. Now go to Object Group. This will join the links of your chain so that they will not come undone. Now go to File, Export Bitmap and choose PNG. Save your work.


  • Fire up Gimp.
  • Open your PNG file. 
  • Now choose the bucket fill and fill the chain corner with a pattern of your choice that you have preciously uploaded to be used in Gimp. Fill the chain photo corner element with the chosen pattern.
  • Now Choose Script-Fu, Bevel and Emboss.
  • Choose the following settings: Style: Outer Bevel; Depth: 5; Direction: Up; Gloss Contour: Linear; Highlight Color White; Shadow Color Black, and leave the rest as is.
  • Click OK. Let it apply.
  • Now go to Filters, Blur. 
  • Once the simple blur is applied, go to Layer, Merge Down.
  • Now, go to File, Save as, Save File Tpe (By Extension) and choose PNG, then say yes to merging layers and exporting, and you're set.


Bible Universe

Very Easy Fun Text in Gimp


This is a very simple tutorial which you can play around with until you can get the look you want for very fun and attractive text for your scrapbooking pages.
This tutorial assumes you have Gimp installed on your computer and that you have also downloaded some of the free patterns that are readily available online.

  • Open up Gimp.
  • Choose any size image you like.
  • Now look for a thick font that will show off the pattern that you will use.
  • I picked Accord Heavy SF Bold, size 76. Make sure your foreground color is Black (you can choose a background color of your choice, a gradient, or nothing. I chose to leave it blank.)
  • Click on the bucket tool and choose a pattern that you like (previously downloaded into your computer and placed in Gimp’s patterns folder.) Try not to choose a pattern that has White in it, because that will be mostly our Gloss color.
  • Now, right-click on the text layer that has your text in the layers menu, and choose Alpha to Selection. Now pick the Ellipse tool and draw an oval over top section of the text, leaving the bottom untouched.
  • Now choose White as your Foreground and a very light version of one of the colors of your pattern (in my case it was a light green.) Choose the blend or gradient tool and stroke from the bottom of your oval upward, filling the area with your gradient. Give it an opacity of 50% by moving the lever down in the toolbox. Go to Filters, Blur and then
  • Save. Got to File, Save as and then choose Select File Type by Extension and choose to save your text as a PNG.

That’s It! Experiment with different fonts and different patterns for different looks and add fun text to your pages, Enjoy!


Bible Universe

Sleek Modern Bow Element in Inkscape and Gimp


This is a super simple element which can take many looks accorind to your taste and to the effects you apply to it!

Note- This tutorial assumes you have Inkscape and Gimp installed on your computer. It also assumes you have at least a basic understanding of both softwares. Please, see our previous tutorials, since they are quite simple for beginners.


Open Inkscape


  • Choose a color you like, I chose a hot pink. Create a horizontal rectangle of the size and width you like.
  • I chose rounded corners but you can leave the edge straight if you want to.
  • Now click on the Arrow tool and then select your rectangle, click again. You will notice some rounded arrows have appeared, you will use those to rotate your rectangle. To rotate your rectangle, drag the corner top arrow and while holding down the space bar of your keyboard, slowly drag your rectangle around until you have formed a bow. Let go when you are pleased with what you've got.


If you are not very sure, practice rotating your rectangle before you press the spacebar. If the space baris not pressed down, the stamping function will not be active and you will not be repeating the pattern.

When you are happy with what you have, go to File, Export as Bitmap.

Fire up Gimp.


  • Open your stamped bow in Gimp.
  • Choose the bucket tool. Select a texture you like. I have a pea green fabric with white polka dots that is perfect for this.
  • Fill the topmost rectangle with the texture you chose. Now click on the Ellipse tool. Make a narrow oval at the center of your bow.
  • Go to Layer, New Layer. Click on the bucket tool. Make sure your Foreground color is Black and fill the oval with Black.
  • Go to Select, Shrink, and shrink your oval by 10 pixels. Choose the gradient tool, and click on the little menu and find Golden, click
  • to select it. Stroke downward with your mouse to make a golden linear gradient to fill the circle in the middle of your bow.


  • Go to Select, Shink, and shrink by 20 pixels. Go to Layer, New Layer. Select the Bucket tool and fill with Black again.
  • Go to Select, Shink and shrink by 15 pixels.Click on your Bucket tool again, and choose another texture and fill your new layer with the texture.
  • I chose a yellow fabric with white polka dots. You can leave it as is, but I chose to go a bit further.
  • Go to Script-Fu, Bevel and Emboss. Choose Outer Bevel, Dept 5, Direction: Up and leave the rest as ic. Click OK and allow Gimp to apply the special effect.
  • Then go to Filters, Blur and apply a soft blur. That's it.


Play with it all you want and make your own bows!


Cute Tag Line Button for Your Blog in Gimp

A tag line is a catchy phrase or short sentence that either describes you, your interests or what you're blog's all about. It is crucial if you have a business!

Here is how to make a cute but super easy tagline button.

This tutorial assumes that you have Gimp installed in your computer, and that you have some basic knowledge of Gimp and that you have made our previous tutorials.
Open Gimp.
Choose a file size convenient for you. Choose the Rectangle tool and make a square in a size you like. Click on the menu to give it rounded corners.
Select the bucket fill and pick a color you like. Fill the square with the color of your choice. Click on the toolbox and look for a color lighter than the color of your square. Choose the ellipse tool and make a circle that almost covers the whole square, except for the bottom corner.
Fill this circle with the lighter color and give it only a 50% transparency (choose transparency from the toolbox by moving the lever in the direction you want.)
Click on the text tool, chose the color black.
Write whatever tag line you like.
Click on the bucket tool. Fill it with a pattern of your choice by selecting pattern fill rather than a color fill.
Go to Layer, New Layer. Then go to Script-Fu and click on Bevel and Emboss.
Choose the following settings:
Style: Outer Bevel
Depth: 10
Direction: Up
Size: 5
Soften: 0
Angle: 120
Gloss Contour: Linear
Highlight Color: White
Shadow Color: Black
Shadow Opacity: 75.0
Surface Contour Linear
and leave the rest as is. Click OK.

Go to Layer, Merge Down.
Save as, Select File Type (By Extension) and save as a Png.
If you need a transparent background, open the file after you have saved it and go to Layer, Add transparency,
choose the fuzzy select tool and click on the background and holding the control key down, click X to delete the background. Save again as a PNG.


You can make a lovely presentation of what your blog is all about with a button like this one. Here is an example to give you an idea.


 Bible Universe, Come and See!

Cottage Flower Element for Scrapbooking


This tutorial assumes the following:
-That you have Inkscape and Gimp installed on your computer.
-That you have already gone through our previous tutorials to learn the basics.
Fire up inkscape.

  • From the vertical toolbar at the left of your page, choose the Polygon tool. Once the Polygons appear at the top of your page, choose Star, for corners, pick 8, spoke ratio, select 0.500 leave the rest of the settings as is.
  • Select the color pink from the palette at the bottom of your page, and draw your star by dragging your mouse. Now, to turn the star into a flower, go to Path, object to Path. Then Edit your paths by clicking on the tool right underneath the select tool arrow. After selecting the toll, click on the star and While you hold the shift key down, click on the node that is at the tip of every point of your star to select it. You will notice that they change color to signify that they are selected.At the top of your page, where the paths editing tools are click on the 9th button, counting from the left (make nodes symmetric) that will make the star look more like a flower. You will see some horizontal handles at the top of your flower "petal" pull on those handles gently to smooth out the petals and make them rounder. When you are happy with what you have, you will click on the selection tool (arrow) and then go to Edit, Duplicate. 
  • Move the duplicated flower to one side and make it a lighter pink, so you can see it better. Click on the arrow tool and then on the duplicated flower until the rotation arrows appear and rotate it a little bit so that the new petals will not cover the ones from the previous flower but be seen on top of them. Click on the arrow tool again and move the new rotated flower on top of the previous one. While holding the ctrl key down, push the new flower in with your mouse fo shrink it just a little bit. Go to Object, Align and Distribute, and choose Center on Vertical Axis, and Center on Horizontal Axis.
  • Now create a new star of 9 spokes (keep the other settings intact) You will notice when you click on the paths tool (you don't have to go to Object, Object to Paths) that there are 2 nodes on the star. Ignore the node at the tip of the star and drag at the node that is near on the edge near the center of the star, while holding the ctrl key to keep things even. Keep this star smaller than the rest of the flower and make the color darker. Drag it to the center of your flower. Now choose the Ellipse or circle tool, choose a darker shade of pink and while holding the ctrl key down, make a circle to go in the center. (Make sure that none of your pieces has a visible stroke color!) Click on the select tool and drag your circle to the centerof your composite flower. Save the flower as a Bitmap. Close Inkscape and open Gimp.
  • Open your flower as a PNG in Gimp. 
  • (This step assumes you have texture patterns installed in your Gimp Patterns folder, please refer to previous tutorials to find out how to do it!)
  • Click on the Bucket Tool, then Pattern Fill and choosing at least 3 different pattern fills, click ont he different portions of your flower and fill them with patterns of your liking.
  • I chose pink pastel fabric patterns. Then go to Filters, Blur. Then Script-Fu, Drop Shadow. Finally, save as a PNG bu clicking on Select File by Extention.
  • Say yes to Merge Visible Layers to export it and save it. 


That's it, now you have a pretty cottage flower element to use for scrapbooking!


Bible Universe

How to Make a Cute Flower Frame in Inkscape and Gimp

This tutorial assumes that you have Inkscape and Gimp installed in your computer, and that you have followed at least some of our previous tutorials to get an idea of how the free softwares work.

You will also need 1 or at least 3 patterns downloaded into your computer (there are many free ones online)
 Fire up Inkscape.
 Click to select the polygon tool and make sure to choose the star shape.
At the top of your page, select the following settings:  Star, Corners: 7 Spoke Ratio: 0.05 Rounded: 0.000 Randomized: 0.000
 Now choose the color you like for the fill and for the stroke (it will only be a base coat) I chose pink. Drag to make your star. Make it large enough so that a face can fit there.
Go to Path, Object to Path. Now click on the tool right underneath the Arrow or Select tool that is the Edit Paths by Nodes tool.
 Now, click on each node (tip of the star) to select it and then, at the top of the page, click on the 9th button from the left, which says make selected nodes symmetric, this will round up the point of the star to look more like a petal.
If you need to, manipulate the nodes manually to make them more to your liking. Now, while the flower is selected, hit Ctrl D to duplicate it twice. Click on the flower and move the duplication to one side of the previous flower, but make sure they are touching end to end, as if they were a string of paper cut flowers.

Position them any way you like, mine are not totally straight, but you can position yours any way you like. Click on the select tool and drag your mouse over the 3 flowers to select them all. Go to Object, Group.

 Now to to File, Export Bitmap, give it a name and export it as a PNG. Close Inskcape. Fire up Gimp. Open your PNG image. Choose the Ellipse tool and make a selection on the center of your first flower, then go to Edit, Cut. Then go to Select, None. Repeat this with every flower.
You can leave your string of flowers frame as is, but I want to embellish mine more.


 If you would like to do the same, before you make your flowers, download free texture patterns (fabric ones) from the internet (there are many for Gimp), in previous tutorials I have taught how to save those.

Once you have chosen the patterns you want to use, pick the bucket tool and choose Pattern Fill and click each flower, applying either one pattern or a different pattern for each flower. Go to Blur, Gaussian Blur and apply a blur of 5.0. Now go to Script-Fu, Drop Shadow and apply. Merge Layers. Go to Save As, choose Select File Type (By Extension). Save as a PNG.

 That's all! You can now use your cute string of flowers frame in your next scrapping project.
Enjoy!

Bible Universe

Let's Make a Fun Text Decal in Inkscape and Gimp


Fire up Inkscape.

Select the Text tool and pick out a font that is thick. I chose Once in a while, size 144.
Write the words you want for your message. I wrote Loving It. But write the words one letter at a time, clicking on the canvas to
deselect each letter, so that the word will not be all together, that way we will be able to work with it.

Now rotate the letters to your likeing. To rotate in one direction, slect the letter you want to rotate, then, press the Alt key plus the opening bracket [, to rotate in the opposite
direction, select the letter you want to rotate and then press the Alt key and the closing bracket ]. Once you have the letters in the direction you want, click on the select tool (arrow) and
draw a selection around the word or words you have writing, now click on Ctrl + G to group the selected letters.

Click on the canvas to deselect the grouping, and click on the letters again, then go to Edit, Duplicate, then Paste. Move the duplicated text below the original text and keep it selected.

Now, click on Ctrl + Shift + F, so that the Fill and Stroke menu will appear. Chose stroke paint.
Choose a medium gray, then go to stroke style, and choose a width of 18.00 and a miter limit of 18.00 and choose for Join choose the first box. Now drag your selection and place it on top of the previous text.
Then, to to the top of the page and select Lower Selection One Step, the 9th button up there from the left.
Now Click on the select arrow and draw a selection over the whole text and go to Path, Union, to join it all together. Export as a PNG, to to File Export Bitmap.

Now, go to Gimp. Open your ext decal there. Now select the bucket tool. Choose a pattern that you like (there are many free patterns online for Gimp that you can download) and click on Pattern Fill.
Apply to the inside of your text. Now select FG color Fill and change the Foreground color to White. Apply White to the gray all around the outside of your text.

Finally, go to Filters, Blur, Gaussian Blur, apply a 5.0 blur. Now go to Script-Fu and choose Drop Shadow. Now go to Filters, Blur. Save as a PNG as follows, go to Save As, then click on Select File Type (By Extension and pick PNG).

Click to merge the layers and then to save it. (Do this even if you see the png on your file name, because otherwise, what I have found is that Gimp tends to save files as its proprietorial file format and then you cannot open them in other scrapbooking software.)

Done!


Bible Universe

How to Make an Easy Heart in Inkscape

There are many ways to make a heart in Inkscape. Some are easier than others for a beginner or for one who is still learning the software. Tinkering with it myself, I found this way of making a heart. As far as I have seen, most all tutorials start with a circle. I didn't. This is not the only way I want to make hearts, but this is the fastest and simplest for now. I hope you enjoy the tutorial and find it useful.
Fire up Inkscape.
Choose the Polygon tool. At the top of your page there will appear two options, a pentagon or a star. Just write 5 corners, and you will get the
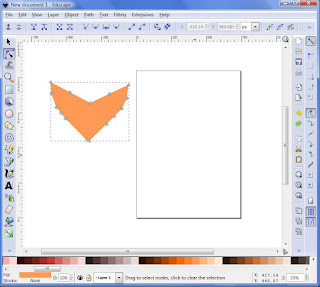
pentagon. Choose a color from the palette at the bottom of your page and draw your pentagon. Now go to Path, Object to Path. Then click on
the nodes tool, which is directly underneath the black little arrow at the top of the sidebar toolbar and add some nodes to your pentagon.
When you are comfortable with how many you have added, just pull the bottom node down to get the pointed bottom of a heart, pinch the center of the
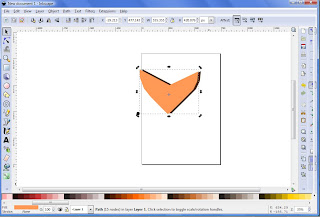
pentagon to get the center of the heart and "fix" the sides to your liking. Now, while the nodes are still selected, go up to the top of the page and select the
smooth node button, which is the 10th button from the left on the top of the page. This will smooth out the lines on the shape of the heart.
This is the simplest way to get a heart in Inkscape. There are other
ways and we might explore them, but play with this one in the meantime!


If you would like to make your heart fancier, lets work on it a little more.
Click on the heart with the select tool and then go File, Duplicate. Move the duplicate heart to the side. Change the duplicate to a darker color.
Since my main heart is peach, I chose to change the duplicate to a dark brown. Now, while the duplicate is selected, go to the top of the page and click on
the 9th button at the top of the page to Lower Selection One Step, now move the darker heart behind the original heart just enough to create a shadow.
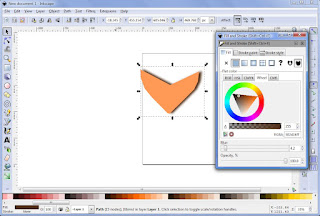
At the bottom of the page, to the left hand corner of the palette, right-click on the Fill, when the little menu opens, choose edit Fill and Stroke. But we will
not be working on the colors, but simply choose a 4.2 blur for the darker heart to turn it into a drop shadow. You can stop right there if you want to, or you
can make your heart a bit fancier still.

If you want it a bit fancier. Click on the first heart (without moving it from where you have it) just to select it, then go to File, duplicate. Now on the palette
below, choose black to change the color of the new duplicate or the darkest color in the palette color of your main heat. I chose a dark, almost black, chocolate.
Now, look at the sidebar. Almost at the buttom, below the bucket fill is the gradient tool. Choose that. And now click on the duplicate you made and stroke with
your mouse upward to create a gradient that will start dark at the bottom point of the heart but as it gets more transparent, it will reveal the original color
you had picked underneath. You can stop there and you have a pretty heart already.

If you want to make it a bit fancier still. Click on the Heart you just shaded with a gradient and select file, duplicate again. This will place another copy of the
heart on top of the one you had and will make the gradient darker. If you like that effect, you can leave it, but we don't want that, so we will choose a lighter
color than the one the original heart had. Then, we will choose the circle tool, select the color white, take out the stroke color by right-licking on the
stroke space right below the palette, and when the drop down list opens, choose Edit stroke and then, when it takes you to the menu, where you will just click on the
X to deselect the stoke color. Make an oblong white shape that will cover the top of the heart. Now, while the oblong shaped is selected, hold the shift key down and
select the heart. This will select both shapes. Now go up the Path, Intersection. This will cut off part of the color and show what is underneath.
Now click on the spot where the oblong used to be that has been cut out, and make it white again. Go to the gradient tool and starting from the top area outside of the
heart and using the left key of your mouse, draw a gradient down. Now go to the Path menu, and go to inset, so that an edge will be created around the lighter part of
the heart. Now select the heart again, and go to Filters, Bevels, Raised Border. Now select the lighter part that we made inside the heart and go to Filters, Bevels,
Deep Colors Plastic. This will give you a fancy heart indeed with very little effort. You can also go to Filters Bevels, Melted Jelly.

Play with it in different colors!

Now you can also make the basic heart shape like we did at the beginning. Cut and paste it into Gimp.
Now you can do a number of things. I chose to go to Filters, Gaussian Blur and blur the original to 13 pixels. Then I took the bucket tool and filled the shape with a
pretty pattern. Finally I went to Script-Fu and chose Drop shadow. Merge layers. Save as a Png.

 Done!

How to Make a Pretty Decorative Element in Inkscape and Gimp


Elements are a great part of scrapbooking. It seems you can never have enough of them!
This is an easy and pretty one to make.
Open Inkscape.
On the sidebar click on the ellipse or circle tool.
While holding down the Ctrl key, draw a circle (that way the circle will be perfectly round) any size you want your heart to be.
On the bottom of the page, to the left, right-click on Stroke, then on Edit Stroke. When the Stroke menu appears, click on the
X to delete the stroke around the circle. Only so that you can see it well, fill with a color of your choice by clicking on
any color on the palette below.

Now, let's make the edging around the element.
Click on the Text tool and write the letter "O" in caps. Click on the color you have chosen on the palette, so that the letter will get that same
color. The font I chose is Roller World BTN Bold Out, 144 pixels, Bold, but you can choose any Inkscape font that you like. With the arrow tool, click on the letter to select it, now click on it
again to rotate it, and rotate it so that the "O" will be upside down. Click on the "O" again to select it. Now, take a look at the toolbar on top of your page. Counting from the left, the 11th tool will raise
your object to the top, click on it.This will make sure that your decorative edge will not sink to the bottom of your element.
Now, while your "O" is still selected, press the shift key down and click on the circle to select them both.
When they are both selected, go to Path, Object to Path. Then go to Extensions, Pattern Along a Path and once the menu opens, select Repeated, Snake, Space between copies: 0.4
Leave everything else as is and click Apply. Let it calculate and render.
Now, hold the shift key down and create a selection that covers the whole thing. Go to Object, Group. Now you can move your circle without it falling apart.

Because Inkscape has the tendency to tile patterns, and I want to fill this element with a pattern that is seamless, we will go to Gimp and fill it up there.
So Go to File, Export and export your element as a PNG image.

Close Inkscape and fire up Gimp. Open your element in Gimp.
Click on the Bucket Tool. Select Pattern fill, and then, click on the little menu to choose any pattern you like. There are many free patterns for Gimp on the Net that you can
download and use. Once you have filled your element with your pattern, go to Script-Fu, Drop Shadow. Raise the Opacity to 80.0 and leave the rest as is and click Okay.
Now to go Filters, Blur. Once the blur is applied, go to Layer, Merge Down.
Now go to File, Save As, Select File Type by Extension and pick PNG, and replace your previous file.

Done!
Heaven Hell

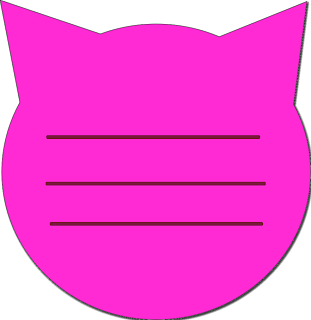
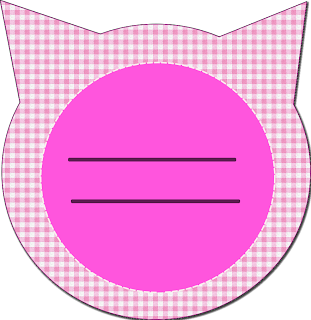
Kitty Cat Journaling Block


I love cats and thought a cat head would make a cute journaling block and I had to try to make one! I did not have anything to go on, so I winged it.
Here is the way I was able to make it.
Start up Inkscape.
Choose the Ellipse tool. Make a circle, any size you like.
Now, choose the star tool, reduce the number of corners to 3 to really make a triangle.
Make a triangle.
Now choose any color you like and fill both the circle and the triangle with that color by clicking on them.
Duplicate your triangle or copy and paste it on the side of the circle.
Now, click on the triangle twice, when you see little arrows all around it, that is the rotate tool, turn the triangle sideways
until it is in a position that would make it look like a cat's ear on the side of your circle. Move the triangle so that it is
right next to your circle, no white line in between. Now click on the other triangle, click again so that the rotate arrows will
appear, rotate it in the opposite direction so that it will form the other cat ear. Place it on the other side of the circle, which
is your Journaling Block and the cat's head. Now Select the arrow tool at the top of your sidebar tools and stroke with your mouse
to select all the objects. Go Object to Path, now go Object Group.
All the pieces will be united into one.
Click to select and copy.


Now open Gimp.
Once Gimp is open, paste your cat head there. Go to Blur, Gaussian Blur and blur by 1 or 2 px.
Now go to Script-Fu and select Drop Shadow. Apply it.
Now change your Foreground color to #7b173f, which is a rich mauve and will show clearly with any pink. (By the way, the color that I chose for
my cat head is #ff2ad4. You can use that or change it to any color you like, before you add your journaling lines.
Select the pencil tool and choose the size Circle 11. Now, while holding down the shift key, click on the cat head where you want your first line
to be, draw the line and click on the end to finish it. Repeat as you wish.


You can leave it as is, or you can make it fancier.

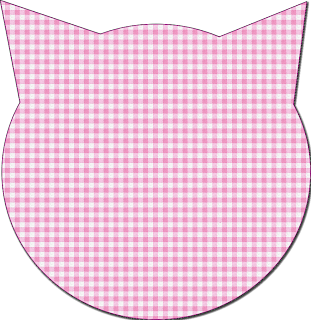
Download from the internet any free texture you like for the theme you're using your cat journaling block for. I chose a pretty white and pink check
I have in Gimp. Once you download it, you must save your work up to this point as a PNG. Close Gimp. Go to your Computer, Program Files, then find
Gimp, and look in its files, depending upon your version of the software, until your find Patterns. Copy and paste the file into that folder or drag it into it.
Open up Gimp again and open up your work. Now, choose the Paint Bucket, then on the tools menu, pick Pattern Fill and choose the one you want.
Apply the Bucket tool to it.


Now you can make the Mauve lines again if you want to and it will be pretty enough.
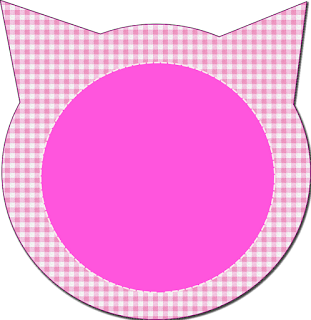
But I want it cuter. So I went back to Inkscape, because this type of thing I find it easier to make over there.
I opened up the program, chose File, then found my kitty cat head and chose Embed.
It came right up. Then I made a circle in a hot pink. Right clicked on Stroke, once the stroke menu opened, I chose Edit Stroke, changed the stroke color to white, then I picked some dashes that I thought would look nice, and raised the width to 6.000
and my circle had pretty white dashes all around and it looked as if it had been stitched. I dragged into the kitty cat head and centered it. Exported it as a PNG.
You can write on it as it is, but I wanted some lines, so I opened up Gimp again and wrote my journaling lines there as we did with the first example.

Hope you liked this tut!


..........
Everlasting Happiness